Android SDK Setup
https://git.messangi.com/messangi/messangi-android-sdk
Requirements
To use the messaging SDK, the following is required:
A registered Firebase Account
Follow the installation steps:
Create Android Studio Project
Configure FCM in Android Studio Project
Messangi.xlm file in value project
LocalBroadcastReceiver in Activity project
BroadcastReceiver in App project
SDK Installation
Step 1: Open Project in Android Studio IDE
Open Android Studio IDE and open the project that you are working on.
Step 2: Include MessagingSDK Library Dependency
In order to deliver Push Notifications to your App, add the followingMessagingSDK dependencies in app.gradle.
build.gradle (Module: app):
...
   android {
       ...
 }
   dependencies {
   ...
   implementation 'com.messaging.sdk:core:0.13.0'
   ...
 }
  ...
build.gradle:
  buildscript {
       // ...
       dependencies {
           // ...
           classpath 'com.google.gms:google-services:4.3.1' // google-services plugin
       }
   }

   allprojects {
       // ...
       repositories {
           google()
           jcenter()


            maven { url "https://nexus.messangi.me/repository/maven-public/" }
           // ...
       }
   }
Step 3: Configure FCM in Android Project
You may add the FCM directly using the Android Studio IDE or in Firebase account.
From Android Studio IDE
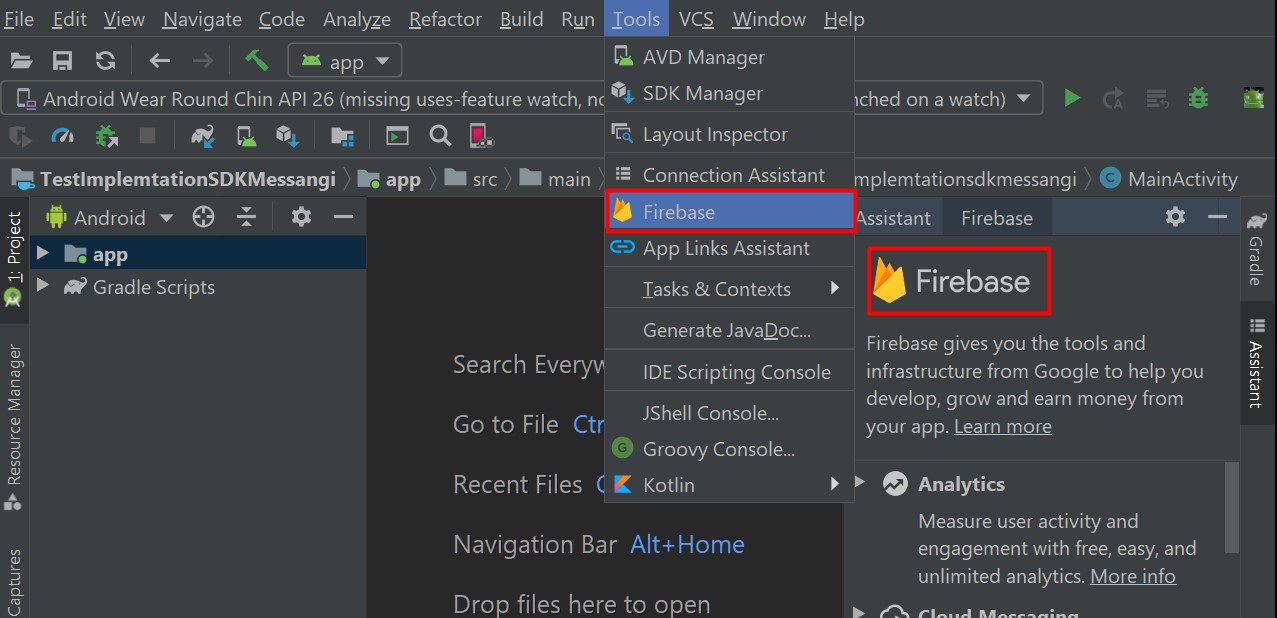
Open Android Studio IDE and open the project that you are working on
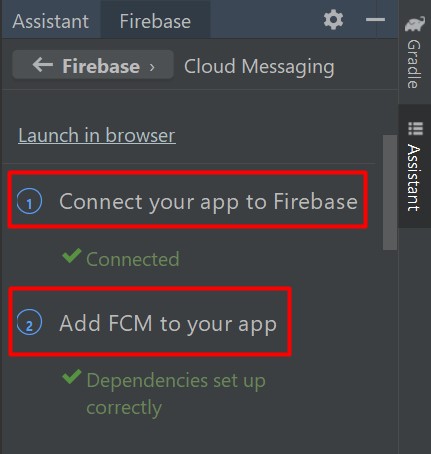
Select your project, go to the Tools tab, and select the Firebase option
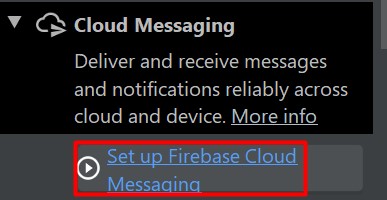
Select Cloud Messaging, and then click to Set up Firebase Cloud Messaging.
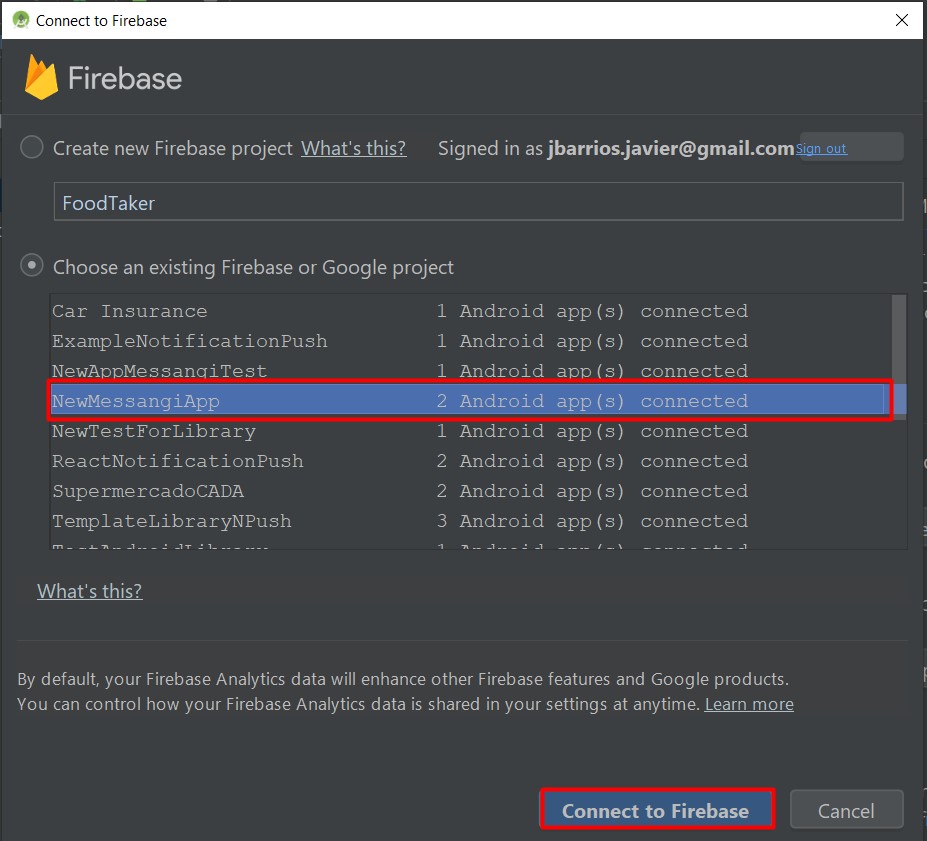
Connect your app to an existing Firebase project or create a new Firebase project in the console.
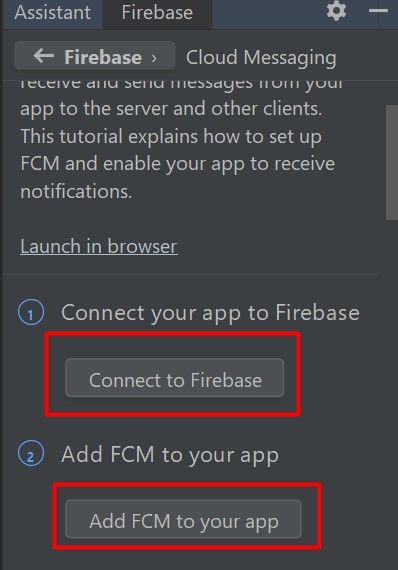
Add FCM to the Application
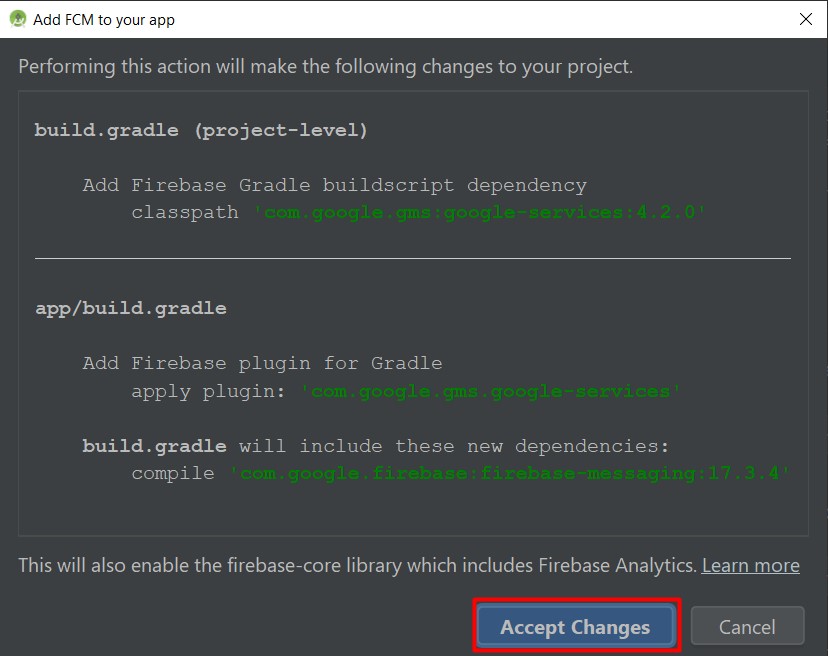
Once you have connected the Android Studio project to a Firebase Project and Added CFM to the App, you shall see the following confirmation screen:
Note
From the Android Studio IDE configuration, do not complete the"Handle message" step as the SDK will do it for you.
you can also see:
https://firebase.google.com/docs/cloud-messaging/android/client?hl=es
Step 4: Obtain and Add Messangi.xml file in values project
Obtain the configuration fileMessaging.xmlfrom the Mobile Messaging Platform. This is found in the Preferences section under the Push tab after completing the initial App Integration setup.
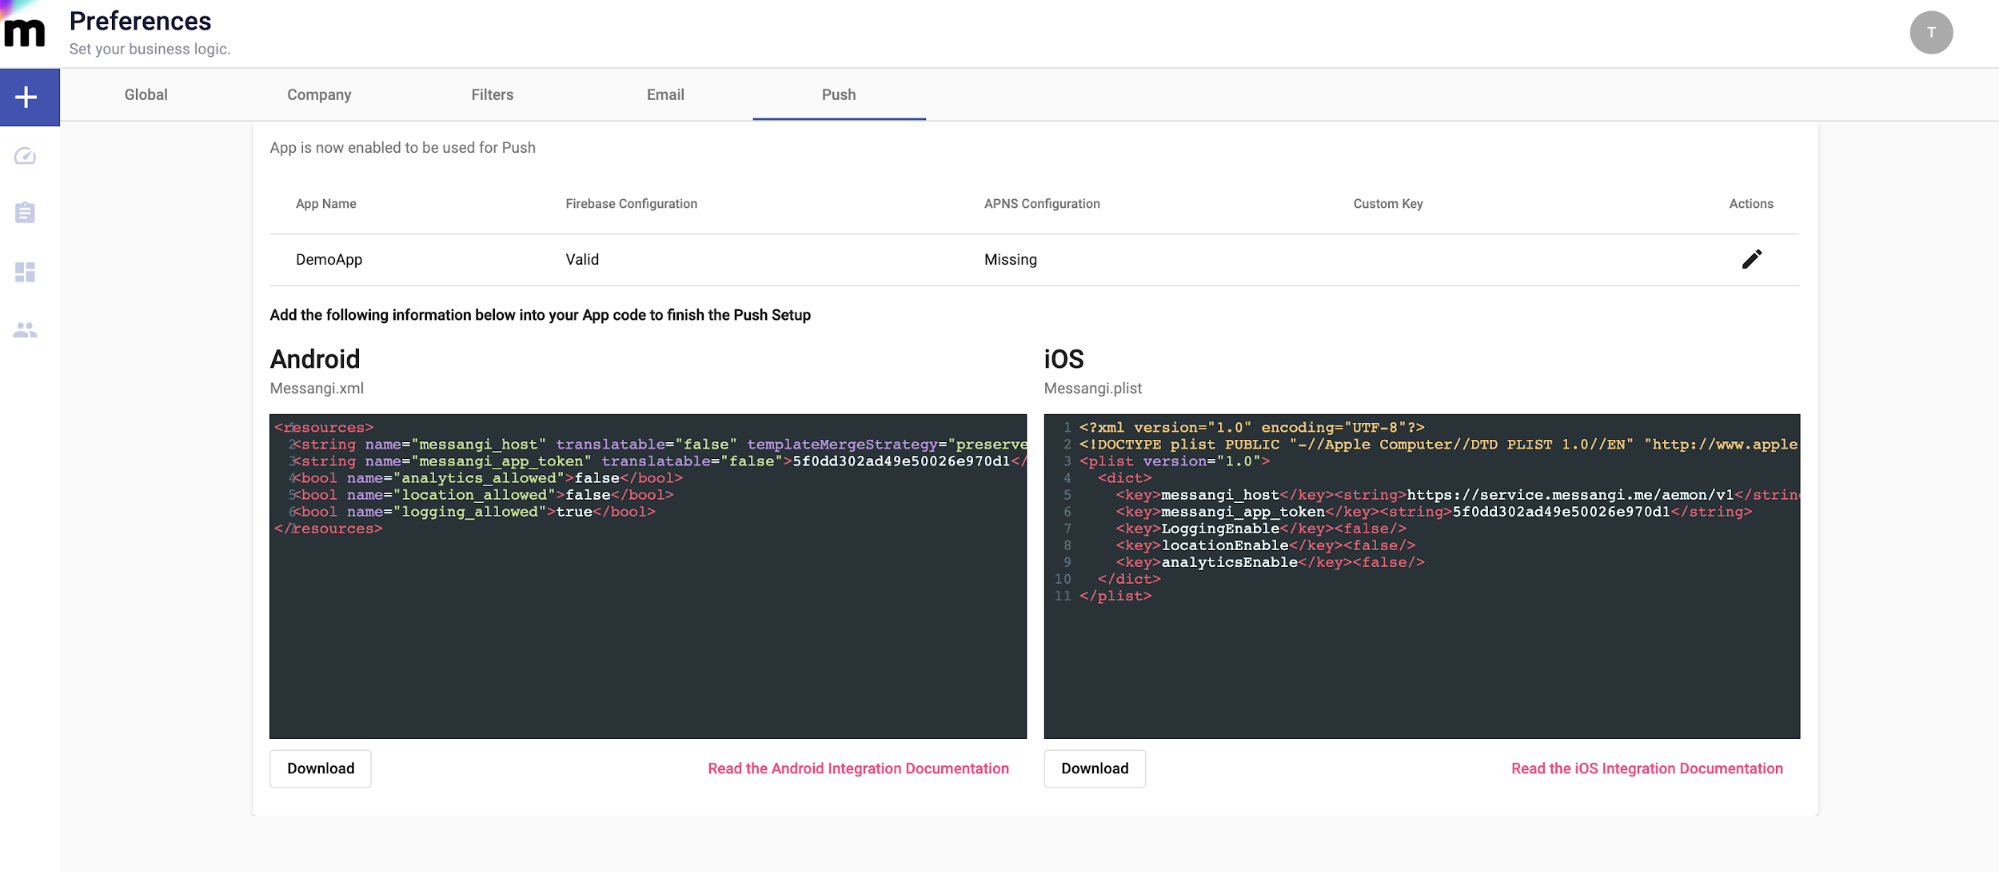
Example ofMessaging.xmlfile:
  <string name="messangi_host" translatable="false" templateMergeStrategy="preserve">https://service.messangi.me/aemon/v1</string>
 <string name="messangi_app_token" translatable="false">YourAppToken</string>
 <bool name="analytics_allowed">false</bool>
 <bool name="location_allowed">false</bool>
 <bool name="logging_allowed">true</bool>
</resources>
Put the configuration file in the values folder of the Android project.
Once you have completed these steps, Push Notifications will be able to be delivered to the Device managed by the OS functionality.
Self Implementation
Basic Notification Management
To handle Notifications from the App, create class in App project namedCustomMessangiService:
package com.ogangi.Messangi.SDK.Demo;

import android.util.Log;

import com.google.firebase.messaging.RemoteMessage;
import com.messaging.sdk.MessagingFirebaseService;
import com.messaging.sdk.MessagingNotification;

public class CustomMessangiService extends MessagingFirebaseService {

 ....
   @Override
   public void onNewToken(String s) {
       super.onNewToken(s);
   }

   @Override
   public void onMessageReceived(RemoteMessage remoteMessage) {
       //example to custom
       MessagingNotification messagingNotification = new MessagingNotification(remoteMessage);
       messaging = Messaging.getInstance(this);
       messaging.sendGlobalEventToActivity(Messaging.ACTION_GET_NOTIFICATION,messagingNotification);
   }
}
It is important to overrideonNewTokenmethod to usesuper.onNewToken(s) (heredity) for the proper functionality of the SDK.
For this custom class you can receive messages overwriting the methodonMessageReceived.
Remember if you want to useCustomMessangiService, declare service in the Manifest.xml of the App project:
<?xml version="1.0" encoding="utf-8"?>
<manifest xmlns:android="http://schemas.android.com/apk/res/android"
   xmlns:tools="http://schemas.android.com/tools"
   package="com.ogangi.Messangi.SDK.Demo">

   <application
       .....
       <activity
       </activity>
       <service
                   android:name=".CustomMessangiService"
                   android:permission="com.google.android.c2dm.permission.SEND">
                   <intent-filter>
                       <action android:name="com.google.firebase.MESSAGING_EVENT" />
                       <action android:name="com.google.android.c2dm.intent.RECEIVE" />
                   </intent-filter>
       </service>
   </application>
</manifest>
Notification Management
The following steps are used to obtain and manage additional delivery data from the sent Push Notifications.
Step 1: Put LocalBroadcastReceiver in Activity project
Put LocalBroadcastReceiver in Activity file project:
...
import com.messaging.sdk.Messaging;
public class MainActivity extends AppCompatActivity{
   ...
          ...
       @Override
   protected void onStart() {
       super.onStart();
       LocalBroadcastManager.getInstance(this).registerReceiver(mReceiver,
               new IntentFilter(Messaging.ACTION_FETCH_DEVICE));
               .....
   }
using the correspondingIntentfilter, example: Messaging.ACTION_FETCH_DEVICE.
Then you can create a method:
public void dothisForRequestUser() {
       Messaging.fetchDevice(false);
   }
Using fetchDevice device delivers the instance of a device by internal memory, local memory or a service.
and Finally in OnDestroy cycle live of Activity:
 @Override
protected void onDestroy() {
  LocalBroadcastManager.getInstance(this).unregisterReceiver(mReceiver);
   super.onDestroy();
}
This method letunregister receivers when activity finishes.
For get a response from the fetch device request, you must implement a LocalBroadcastReceiver in the activity:
private BroadcastReceiver mReceiver=new BroadcastReceiver() {
       @Override
       public void onReceive(Context context, Intent intent) {
           boolean hasError=intent.getBooleanExtra(Messaging.INTENT_EXTRA_HAS_ERROR,true);

           if (!hasError ) {
               Serializable data=intent.getSerializableExtra(Messaging.INTENT_EXTRA_DATA);
               if(intent.getAction().equals(Messaging.ACTION_FETCH_DEVICE)&& data!=null){
                   messagingDevice = (MessagingDevice) data; //you can cast this for get information
                   //or messagingDevice = MessagingDevice.getInstance();
                   .....
               }else if(intent.getAction().equals(Messaging.ACTION_FETCH_USER)&& data!=null){
                   messagingUser =(MessagingUser) data;
                   //or messagingUser = MessagingUser.getInstance();
                   .......
               }else if(((intent.getAction().equals(Messaging.ACTION_GET_NOTIFICATION))||(intent.getAction().equals(Messaging.ACTION_GET_NOTIFICATION_OPENED)))&& data!=null){
                   messagingNotification=(MessagingNotification)data;
                   .....
               }else if(intent.getAction().equals(Messaging.ACTION_SAVE_DEVICE)&& data!=null) {
                   messagingDevice = (MessagingDevice) data; //you can cast this for get information
                   //or messagingDevice = MessagingDevice.getInstance();
                  ......
               }else if(intent.getAction().equals(Messaging.ACTION_SAVE_USER)&& data!=null) {
                   messagingUser =(MessagingUser) data; //you can cast this for get information
                   //or messagingUser = MessagingUser.getInstance();

           }else if(intent.getAction().equals(Messaging.ACTION_REGISTER_DEVICE) ) {
                   messagingDevice = (MessagingDevice)data;
                   //or messagingDevice = MessagingDevice.getInstance();
               ......
               }
               .....
           }else{
               Toast.makeText(getApplicationContext(),"An error occurred on action "
                       +intent.getAction(),Toast.LENGTH_LONG).show();
           }
           ......
       }
   };
  //you can see all the implementation in example app
Step 2: Put BroadcastReceiver in app project
...
import …...

public class MessagingNotificationReceiver extends BroadcastReceiver{
   ...

          ...
       @Override
   public void onReceive(Context context, Intent intent) {
      boolean hasError=intent.getBooleanExtra(Messaging.INTENT_EXTRA_HAS_ERROR,true);

       if (!hasError ) {
           String action=intent.getAction();
           Serializable data = intent.getSerializableExtra(Messaging.INTENT_EXTRA_DATA);
           if(intent.getAction().equals(Messaging.ACTION_GET_NOTIFICATION)&& data!=null){
           ........
           }
           }
               .....
   }
   //to send data to Activity if app is foreground
   private void sendEventToActivity(String action,Serializable something, Context context) {

       if(something!=null) {
           Intent intent = new Intent(action);
           intent.putExtra(Messaging.INTENT_EXTRA_DATA, something);
           intent.putExtra(Messaging.INTENT_EXTRA_HAS_ERROR, something == null);
           LocalBroadcastManager.getInstance(context).sendBroadcast(intent);
       }else{
           //error
       }
   }
It is important to use, please declare BroadcastReceiver in Manifest.xml of app project, example:
<?xml version="1.0" encoding="utf-8"?>
<manifest xmlns:android="http://schemas.android.com/apk/res/android"
   xmlns:tools="http://schemas.android.com/tools"
   package="com.ogangi.Messangi.SDK.Demo">

   <application
       .....
       <activity
       </activity>
       <receiver
           android:name=".MessagingNotificationReceiver"
           android:enabled="true"
           android:permission="${applicationId}.permission.pushReceive"
           android:exported="false"
           tools:ignore="Instantiatable">
           <intent-filter>
               <action android:name="com.messaging.sdk.PUSH_NOTIFICATION"/>
           </intent-filter>
       </receiver>
   </application>
   <permission
       android:name="${applicationId}.permission.pushReceive"
       android:protectionLevel="signature" />
   <uses-permission android:name="${applicationId}.permission.pushReceive" />
</manifest>
Step 3: Receive Notifications in Background
To handle Notifications in Background, use this code in Activity:
//for handle notification from background
       Bundle extras=getIntent().getExtras();
       if(extras!=null){
           isBackground=extras.getBoolean("isInBackground",false);
           if(isBackground) {
               Serializable data = extras.getSerializable(Messaging.INTENT_EXTRA_DATA);
               messagingNotification=(MessagingNotification)data;
               .....
           }else {
               //to process notification from background mode
   MessagingNotification notification=Messaging.checkNotification(extras);
               .......
           }
       }
Usage
To make use of the functionalities that the Messanging SDK offers, utilize the Messaging class.
To obtain the instance of this class:
@Override
protected void onCreate(Bundle savedInstanceState) {
   super.onCreate(savedInstanceState);
Messaging messaging=Messaging.getInstance(this);
}
//get Instance of Messaging..
All the services offered by this library are provided by means of an instance of the Messaging class, and it can be obtained that it was indicated later.
Obtain User Data
Method to obtain each User by Device that is registered from the service.
Whenforsecallservice=true, search device parameters through the service.
@Override
protected void onResume() {
   super.onResume();
Messaging.fetchUser(getApplicationContext(), true);
}
you can use in the activity:
messagingUser.addProperty(key,value);
For asing property to the user, example of a Property: Juan, Alvarado, ja@gmail.com or 555-55-55, and example of key : example name, LastName or Phone.
then for update User data, you can use:
messagingUser.save(getApplicationContext());;
This method usesLocalBroadcastReceiver to send Instance from the SDK to Activity. (Please refer to Step 1).
Obtain Device
Receive the OS version of the user’s device, example:
@Override
protected void onStart() {
super.onStart();
LocalBroadcastManager.getInstance(this).registerReceiver(mReceiver,
new IntentFilter(Messaging.ACTION_FETCH_DEVICE));
}
...
@Override
protected void onResume() {
super.onResume();
Messaging.fetchDevice(false);
}
private BroadcastReceiver mReceiver=new BroadcastReceiver() {
@Override
public void onReceive(Context context, Intent intent) {
boolean hasError=intent.getBooleanExtra(Messaging.INTENT_EXTRA_HAS_ERROR,true);
if (!hasError ) {
Serializable data=intent.getSerializableExtra(Messaging.INTENT_EXTRA_DATA);
if(intent.getAction().equals(Messaging.ACTION_FETCH_DEVICE)&& data!=null){
messagingDevice = (MessagingDevice) data; //you can cast this for get information
.....
}else if(intent.getAction().equals(Messaging.ACTION_FETCH_USER)&& data!=null){
messagingUser =(MessagingUser) data;
.......
}else{
Toast.makeText(getApplicationContext(),"An error occurred on action "
+intent.getAction(),Toast.LENGTH_LONG).show();
}
......
}
};
//you can see all the implementation in example app
@Override
protected void onDestroy() {
LocalBroadcastManager.getInstance(this).unregisterReceiver(mReceiver);
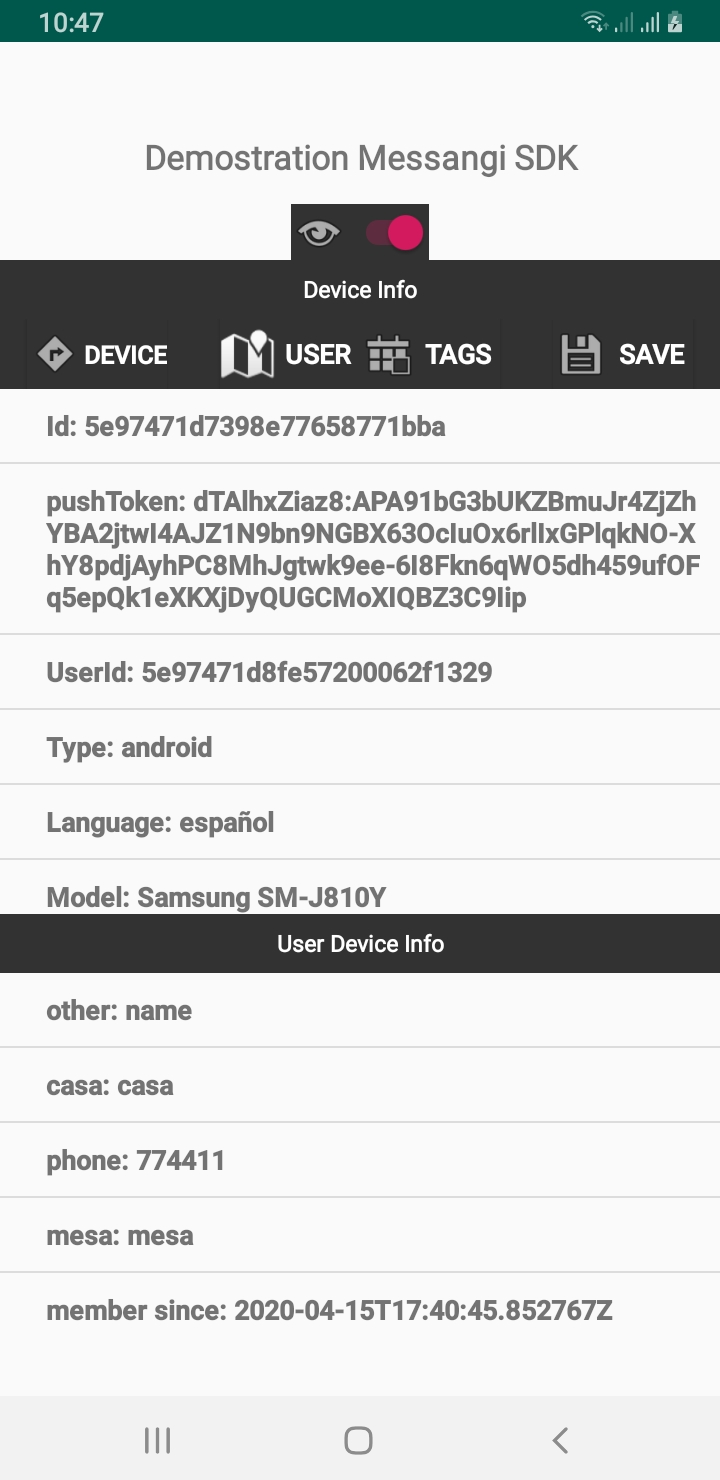
}MessagingDevice is used to handle Device parameters in the SDK.
To obtain this device instance, the SDK can provide it in three ways:
local memory
internal memory
service
To add a Tag to a Device, you may Save and it will immediately be updated in the database.
messagingDev.addTagToDevice(tags);
This method usesBroadcastReceiver to send Instance from the SDK to Activity. (Please refer to Step 1).
messagingDevice.save(getApplicationContext());
Deep Linking
MessagingSDK allows for Push Notifications to contain a link to a section inside of the Application or to a Web Page link.
For this we have 3 modalities:
Payload
URL Schema
Universal Links
Payload
The "click_action" property sent through the Push Notification will be used, which has two cases:
Notification in Foreground: handled by the SDK
Notification in Background: handled by the OS
Notification in Foreground
The Notification will be handled by the SDK taking the property "click_action", which should have a value as shown in the example:
"click_action": "com.ogangi.Messangi.SDK.Demo.ExampleActivity "
This is then processed by the SDK, allowing the host app to create an icon in the notification tray that when the user opens the activity it executes the defined action.
The declaration of the activity must be done in the AndroidManifest.xml file:
<activity android: name = ".ExampleActivity">
            <intent-filter>
            <action android: name = "com.ogangi.Messangi.SDK.Demo.ExampleActivity" />
            <category android: name = "android.intent.category.DEFAULT" />
            </intent-filter>
       </activity>
In MainActivity of the Demo App, a Foreground Notification is sent:
Arrival of the Push Notification to the App that shows the detail of the Notification and in the upper part, it displays the generation of the Notification due to theClick-Actionparameter. To generate the notification you can see thelaunchNotification method in MainActivity of the Demo app.
Then open the notification palette:
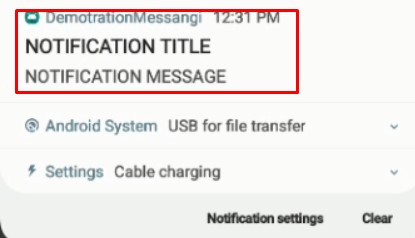
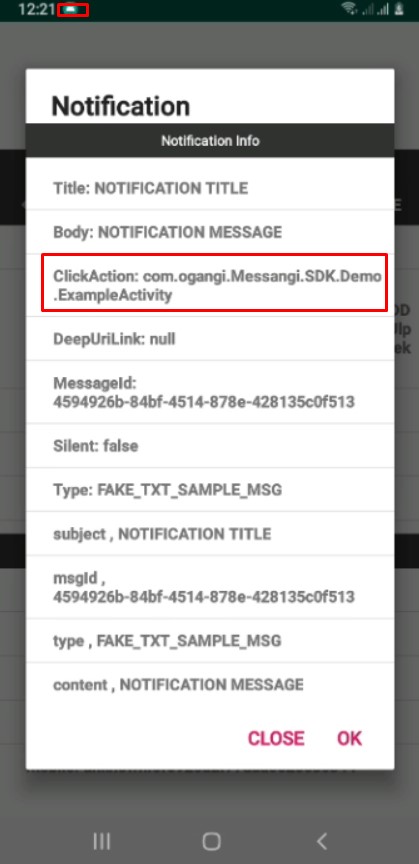
When the Notification is clicked and is opened, the predetermined activity is executed and data is obtained with the following structure:
Bundle extras=getIntent().getExtras();
boolean enable=extras.getBoolean("enable",false);
additionalData = new HashMap<>();
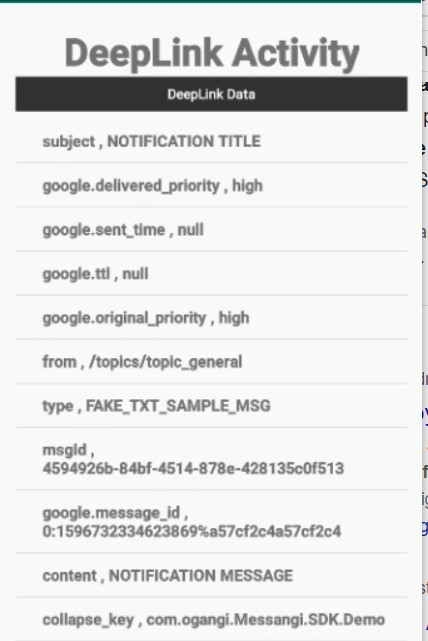
if(extras!=null && !enable) {
for (String key : extras.keySet()) {
additionalData.put(key, extras.getString(key));
messangiData.add(key + " , " + extras.getString(key));
}
.....
}else{
Serializable data = extras.getSerializable(Messaging.INTENT_EXTRA_DATA);
messagingNotification=(MessagingNotification)data;
additionalData=messagingNotification.getAdditionalData();
if(additionalData!=null&& additionalData.size()>0) {
messangiData.add("Title: " + messagingNotification.getTitle());
messangiData.add("Body: " + messagingNotification.getBody());
messangiData.add("ClickAction: " + messagingNotification.getClickAction());
messangiData.add("DeepUriLink: " + messagingNotification.getDeepUriLink());
for (Map.Entry entry : messagingNotification.getAdditionalData().entrySet()) {
if (!entry.getKey().equals("profile")) {
messangiData.add(entry.getKey() + " , " + entry.getValue());
}
}
}
}
.....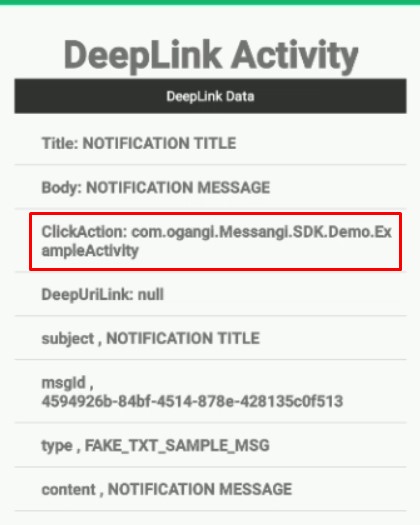
Finally the screen of the open activity is presented as a product of the parameter"Click_Action"
" click_action ":" com.ogangi.Messangi.SDK.Demo.ExampleActivity
Notification in Background
In this case, the Notification will be handled by the OS with its native behavior.
The activity when the Notification is opened by the user must be declared, it is important to remember that the Notification must contain the field:
" click_action ":"com.ogangi.Messangi.SDK.Demo.ExampleActivity "
Then open the notification palette:
Finally the screen of the open activity is presented as a product of the parameter"Click_Action"
This action was performed using the OS native behavior, but it is important that the Notification contains the "click_action" field:
"com.ogangi.Messangi.SDK.Demo.ExampleActivity"
The obtained data can also be processed using the following code in ExampleActivity.class:
Bundle extras=getIntent().getExtras();
       boolean enable=extras.getBoolean("enable",false);
       additionalData = new HashMap<>();
       if(extras!=null && !enable) {
           for (String key : extras.keySet()) {
              additionalData.put(key, extras.getString(key));
               messangiData.add(key + " , " + extras.getString(key));
           }
           .....
       }else{
           Serializable data = extras.getSerializable(Messaging.INTENT_EXTRA_DATA);
           messagingNotification=(MessagingNotification)data;
           additionalData=messagingNotification.getAdditionalData();
           if(additionalData!=null&& additionalData.size()>0) {
               messangiData.add("Title: " + messagingNotification.getTitle());
               messangiData.add("Body: " + messagingNotification.getBody());
               messangiData.add("ClickAction: " + messagingNotification.getClickAction());
               messangiData.add("DeepUriLink: " + messagingNotification.getDeepUriLink());
               for (Map.Entry entry : messagingNotification.getAdditionalData().entrySet()) {
                   if (!entry.getKey().equals("profile")) {
                       messangiData.add(entry.getKey() + " , " + entry.getValue());
                   }

               }
           }
       }
Url Schema
The "link" property sent through the Push Notification will be used, which has two cases:
Notification in Foreground: handled by the SDK
Notification in Background: handled by the OS
Notification in Foreground
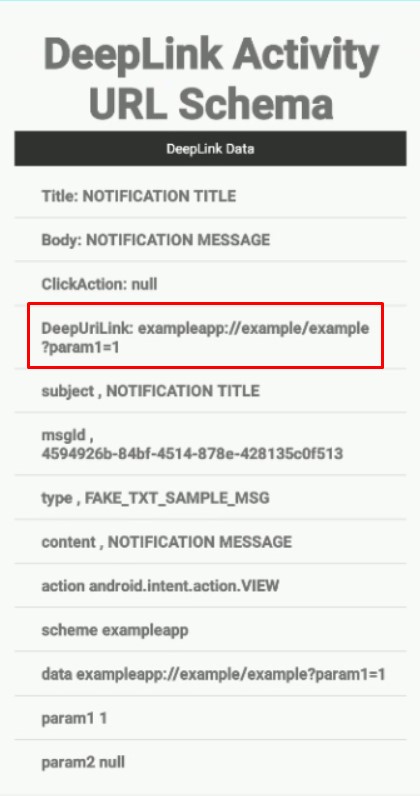
The Notification will be handled by the SDK taking the property "link", which should have a value as shown in the example:
"link": "exampleapp://example/example?param1=1"
This is then processed by the SDK, allowing the host app to open the activity and take the data that brings the push notification.To open the Activity you can see the launchBrowser method in MainActivity of the Demo app.
The declaration of the activity must be done in the AndroidManifest.xml file:
<activity android: name = ".ExampleURLSchemasActivity">
            <intent-filter>
             <action android:name="android.intent.action.VIEW" />
                <category android:name="android.intent.category.DEFAULT" />
                <category android:name="android.intent.category.BROWSABLE" />
                <data
                    android:host="example"
                    android:pathPrefix="/example"
                    android:scheme="exampleapp" />
             </intent-filter>
       </activity>
In MainActivity of the Demo App, a Foreground Notification is sent:
after the push notification is sent, the activity ExampleURLSchemasActivity will open automatically:
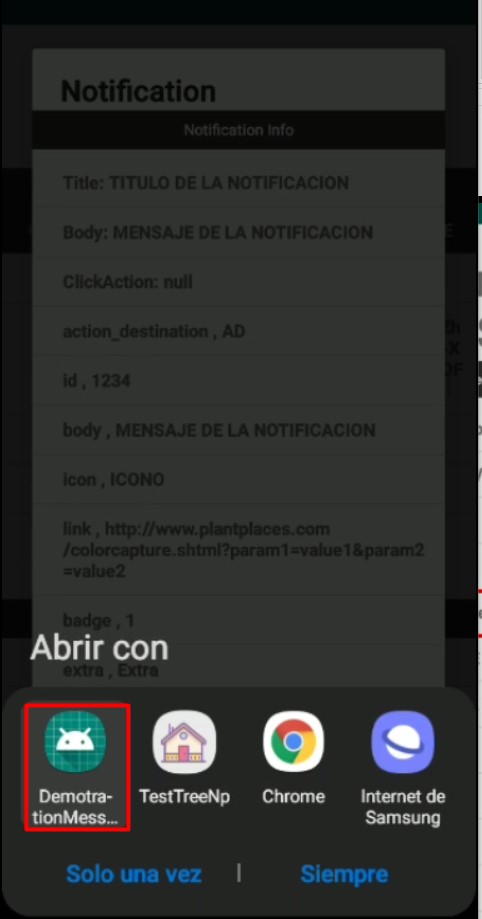
Notification in Background
In this case, the Notification will be handled by the OS with its native behavior.
The activity when the Notification is opened by the user must be declared, it is important to remember that the Notification must contain the field:
"link":"exampleapp://example/example?param1=1"
Then open the notification palette:
after clicking on the notification, the following Activity will open:
The obtained data can also be processed using the following code in ExampleURLSchemasActivity.class:
Bundle extras=getIntent().getExtras();
       boolean enable=extras.getBoolean("enable",false);
       additionalData = new HashMap<>();
       if(extras!=null && !enable) {
           for (String key : extras.keySet()) {
              additionalData.put(key, extras.getString(key));
               messangiData.add(key + " , " + extras.getString(key));
           }
           .....
       }else{
           Serializable data = extras.getSerializable(Messaging.INTENT_EXTRA_DATA);
           messagingNotification=(MessagingNotification)data;
           additionalData=messagingNotification.getAdditionalData();
           if(additionalData!=null&& additionalData.size()>0) {
               messangiData.add("Title: " + messagingNotification.getTitle());
               messangiData.add("Body: " + messagingNotification.getBody());
               messangiData.add("ClickAction: " + messagingNotification.getClickAction());
               messangiData.add("DeepUriLink: " + messagingNotification.getDeepUriLink());
               for (Map.Entry entry : messagingNotification.getAdditionalData().entrySet()) {
                   if (!entry.getKey().equals("profile")) {
                       messangiData.add(entry.getKey() + " , " + entry.getValue());
                   }

               }
           }
       }
Universal Link
The "link" property sent through the Push Notification will be used, which has two cases:
Notification in Foreground: handled by the SDK
Notification in Background: handled by the OS
Notification in Foreground
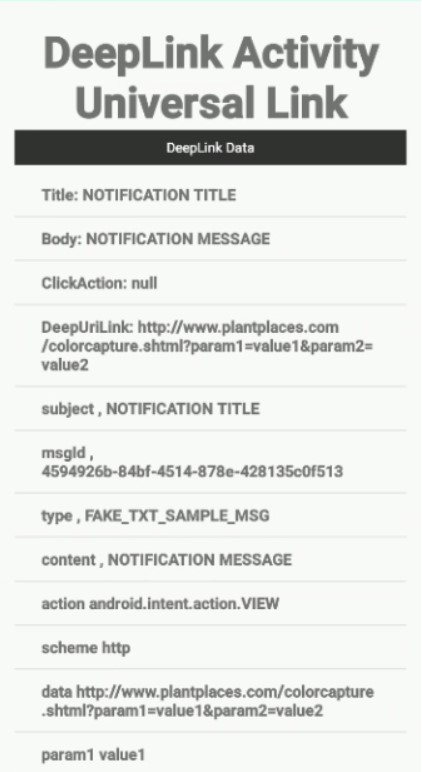
The Notification will be handled by the SDK taking the property "link", which should have a value as shown in the example:
"link": "http://www.plantplaces.com/colorcapture.shtml?param1=value1¶m2=value2"
This is then processed by the SDK, allowing the host app to open the activity and take the data that brings the push notification.To open the Activity you can see the launchBrowser method in MainActivity of the Demo app.
The declaration of the activity must be done in the AndroidManifest.xml file:
<activity android: name = ".ExampleUrlActivity">
            <intent-filter>
             <action android:name="android.intent.action.VIEW" />
                <category android:name="android.intent.category.DEFAULT" />
                <category android:name="android.intent.category.BROWSABLE" />
                <data                       android:host="www.plantplaces.com"                    android:pathPrefix="/colorcapture.shtml"                    android:scheme="http" />
             </intent-filter>
       </activity>
In MainActivity of the Demo App, a Foreground Notification is sent:
after the push notification is sent, the app demo will open automatically by selection,
the the activityExampleUrlActivity will open:
The obtained data can also be processed using the following code in ExampleURLActivity.class:
Bundle extras=getIntent().getExtras();
       boolean enable=extras.getBoolean("enable",false);
       additionalData = new HashMap<>();
       if(extras!=null && !enable) {
           for (String key : extras.keySet()) {
              additionalData.put(key, extras.getString(key));
               messangiData.add(key + " , " + extras.getString(key));
           }
           .....
       }else{
           Serializable data = extras.getSerializable(Messaging.INTENT_EXTRA_DATA);
           messagingNotification=(MessagingNotification)data;
           additionalData=messagingNotification.getAdditionalData();
           if(additionalData!=null&& additionalData.size()>0) {
               messangiData.add("Title: " + messagingNotification.getTitle());
               messangiData.add("Body: " + messagingNotification.getBody());
               messangiData.add("ClickAction: " + messagingNotification.getClickAction());
               messangiData.add("DeepUriLink: " + messagingNotification.getDeepUriLink());
               for (Map.Entry entry : messagingNotification.getAdditionalData().entrySet()) {
                   if (!entry.getKey().equals("profile")) {
                       messangiData.add(entry.getKey() + " , " + entry.getValue());
                   }

               }
           }
       }
Notification in Background
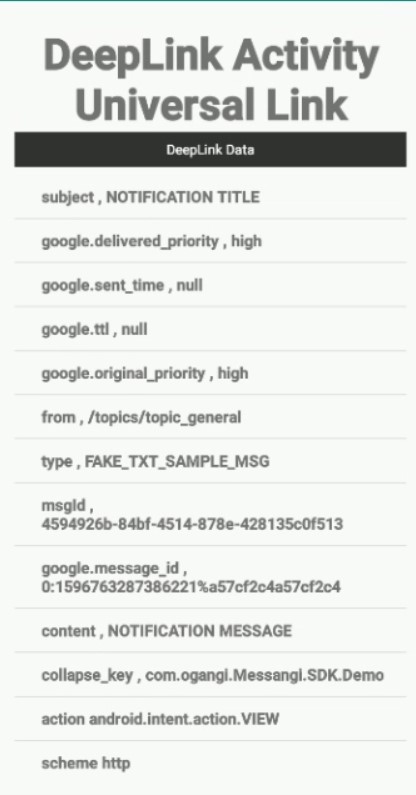
In this case, the Notification will be handled by the OS with its native behavior.
The activity when the Notification is opened by the user must be declared, it is important to remember that the Notification must contain the field:
"link":"http://www.plantplaces.com/colorcapture.shtml?param1=value1¶m2=value2"
Then open the notification palette:
after clicking on the notification, the following Activity will open:
The obtained data can also be processed using the following code in ExampleURLActivity.class:
Bundle extras=getIntent().getExtras();
       boolean enable=extras.getBoolean("enable",false);
       additionalData = new HashMap<>();
       if(extras!=null && !enable) {
           for (String key : extras.keySet()) {
              additionalData.put(key, extras.getString(key));
               messangiData.add(key + " , " + extras.getString(key));
           }
           .....
       }else{
           Serializable data = extras.getSerializable(Messaging.INTENT_EXTRA_DATA);
           messagingNotification=(MessagingNotification)data;
           additionalData=messagingNotification.getAdditionalData();
           if(additionalData!=null&& additionalData.size()>0) {
               messangiData.add("Title: " + messagingNotification.getTitle());
               messangiData.add("Body: " + messagingNotification.getBody());
               messangiData.add("ClickAction: " + messagingNotification.getClickAction());
               messangiData.add("DeepUriLink: " + messagingNotification.getDeepUriLink());
               for (Map.Entry entry : messagingNotification.getAdditionalData().entrySet()) {
                   if (!entry.getKey().equals("profile")) {
                       messangiData.add(entry.getKey() + " , " + entry.getValue());
                   }

               }
           }
       }