API Tutorials
Learn how to use the Digital Engagement APIs by following the steps in our tutorials.
Lists: Manage your message and campaign audience.
Segments Manage your list segments.
Managing Templates: Manage your messaging templates.
Send Broadcasts Learn how to send bulk messages to various channels and customize your messages.
Send SMS messages: Learn how to send transactional SMS messages.
Send Emails: Learn how to send transactional Emails.
Wallet Passes : Learn how to create wallet templates and passes for your customers.
List Management
Through the List Management API you can create new lists, subscribe new users to your existing lists, manage segments and create or delete custom columns.
The List Management API is used to create and manage lists (collections) and the content of each list (content of each collection). The content of each list corresponds to the subscribers.Therefore, this API not only allows you to manage lists, also allows you to edit, create, delete subscribers and columns, among other functions.
Lists: Create a new list where subscribers can be added or imported via JSON or CSV file.
Subscribers: You can add or remove subscribers one by one or multiple subscribers, fetch and update their information and batch import new subscribers.
Segments: Create targeted sub-groups of subscribers based on conditions you set.
Columns: Allows you to create and index columns to the desired list.
Updating Lists
Keeping your subscriptions lists up to date is essential to reaching the right audience. There are a combination of APIs that allow you to add, edit or delete subscribers. With these methods you can ensure that no one misses out on your campaigns.
Adding subscribers
Subscribers might be added one by one or in bulk by sending their basic information.
When you add or edit subscribers , the response body contains the data of the subscriber or subscribers created:
Example response body
{
  "meta": {
    "timestamp": 1597166699457,
    "transactionId": "70169d77-c165-4795-9932-35b8a3af96fb",
    "explain": "a descriptive text"
  },
  "data": {
    "id": "507f1f77bcf86cd799439011",
    "key": "12341236545, 507f1f77bcf86cd799439011, homer@example.com",
    "data": {
      "id": "5f7b1af6535f6b5151040776",
      "key": "5f7b1af6535f6b5151040776",
      "data": {
        "address": "12345",
        "member since": "2020-10-05T13:09:10.233573Z",
        "last updated": "2020-10-05T13:09:10.233573Z",
        "mobile": "unknown.5f7b1af6535f6b5151040776",
        "id": "5f7b1af6535f6b5151040776",
        "email": "The Tester"
      }
    }
  }
}
The parameters presented in the response body example when creating the subscribers are the following:
Parameter | Description |
|---|---|
address | Subscriber address |
member since | Subscriber entry date. |
last update | Date of the last subscriber update. |
mobile | Subscriber mobile phone |
id | Subscriber identifier |
Subscriber email address |
Adding single subscribers
You have the option to add one by one subscriber to the list.
HTTP Request :POST /lists/{listId}/subscribers
Request body
{
  "additionalProp1": {},
  "additionalProp2": {},
  "additionalProp3": {}
}
To add a single subscriber, you need to provide the unique identifier of the list you want to add the subscriber.
Required parameter | Description |
|---|---|
listId | You must provide the id of the list where you want to add the subscriber. |
Adding multiple subscribers
There are two options to add multiple subscribers:
Adding multiple subscribers by JSON
Adding multiple subscribers by CSV
Adding multiple subscribers by JSON
You can add bulk subscribers in JSON format.
HTTP Request :POST /lists/{listId}/subscribers/bulk
Request body
[
  {
    "mobile": "+5841474662698",
    "email": "test@testing.com",
    "first Name": "Homer"
  },
  {
    "mobile": "+123456",
    "email": "lisa@example.com",
    "first Name": "Lisa"
  }
]
To add multiple subscribers, you need to provide the unique identifier of the list you want to add the multiple subscribers.
Required parameter | Description |
|---|---|
listId | You must provide the id of the list where you want to add the subscribers. |
Adding multiple subscribers by CSV file
You can add bulk subscribers in CSV format.
HTTP Request :POST /lists/{listId}/subscribers
To add subscribers, you need to provide the unique identifier of the list you want to add the subscribers by CSV file.
Required parameter | Description |
|---|---|
listId | You must provide the id of the list where you want to add the subscribers. |
Updating Subscribers
In order to update a subscriber PUT and PATCH method might be used. Note that PUT method is going to REPLACE the current data of the subscriber for the data sent in the request (meaning fields not sent are going to be erased from subscriber) while PATCH method ONLY edits the fields sent in the request:
Updates a subscriber with the state defined by the representation enclosed in the request:
HTTP Request :PUT /lists/{listId}/subscribers/{subscriberId}
Edits only the fields sent in the request for a subscriber, the others remain the same:
HTTP Request :PATCH /lists/{listId}/subscribers/{subscriberId}
In both cases, the following request body is presented, together with the required fields:
Request body
{
"name": "Homer",
"email": "homer@example.com"
}
To update a subscriber, you need to provide the unique identifier of the list and subscriber id you want to update.
Required parameter | Description |
|---|---|
listId | You must provide the id of the list where you want to edit the subscriber. |
subscriberId | The identifier of the subscriber you want to edit |
Deleting Subscribers
You can delete a specific subscriber from the desired list.
HTTP Request : DELETE /lists/{listId}/subscribers/{subscriberId}
To delete a subscriber, you need to provide the unique identifier of the list and subscriber id you want to delete.
Required parameter | Description |
|---|---|
listId | You must provide the id of the list where you want to delete the subscriber. |
subscriberId | The identifier of the subscriber you want to delete. |
Managing Segments
A segment can be defined as a subset of the main list given some conditions and it can be created from a CSV file or from a JSON body in the request.
When you create or edit segments, the response body contains the basic data of the segment created:
Example response body
{
  "meta": {
    "timestamp": 1597166699457,
    "transactionId": "70169d77-c165-4795-9932-35b8a3af96fb",
    "explain": "a descriptive text"
  },
  "data": {
    "id": "507f1f77bcf86cd799439011",
    "name": "people who likes movies",
    "userName": "homer",
    "listId": 203,
    "queryRule": "movies[eq]=horror&age[gt]=21",
    "total": 7
  }
}
The parameters presented in the response body example when creating the segment are the following:
Parameter | Description |
|---|---|
id | Segment identifier |
name | Segment name |
username | Segment creator username |
listId | List identifier where the segment is assigned |
queryRule | Conditions applied to the main list |
total | Total indicating the amount of subscribers in the segment |
Creating a segment from a CSV File
Creates a segment from the main list given a CSV file. Note that some fields are required such as the name of the segment, the source column (column to segment from file) and the target column (column to apply segment from main list):
HTTP Request :POST /lists/{listId}/segments
To create a segment, you need to provide the unique identifier of the list you want to create the segment by CSV file.
Required parameter | Description |
|---|---|
listId | You must provide the id of the list where you want to create the segment. |
Creating a segment from a JSON body
Creates a segment from the information given in the body of the request:
HTTP Request :POST /lists/{listId}/segments
Request body
{
  "name": "females",
  "queryRule": "gender[eq]=f",
  "segmentType": "DYNAMIC"
}
To create a segment, you need to provide the unique identifier of the list you want to create the segment by JSON body.
Required parameter | Description |
|---|---|
listId | You must provide the id of the list where you want to create the segment. |
Updating a segment
Updates a segment according to the data sent in the request:
HTTP Request :PATCH /lists/{listId}/segments/{segmentId}
Request body
{
  "name": "females",
  "queryRule": "gender[eq]=f",
  "segmentType": "DYNAMIC"
}
To update a segment, you need to provide the unique identifier of the list and segment id you want to update.
Required parameter | Description |
|---|---|
listId | You must provide the id of the list where you want to edit the segment. |
segmentId | You must provide the id of the segment you want to edit. |
Deleting a segment
Deletes a specific segment from a list.
HTTP Request :DELETE /lists/{listId}/segments/{segmentId}
To delete a segment, you need to provide the unique identifier of the list and segment id you want to delete.
Required parameter | Description |
|---|---|
listId | You must provide the id of the list where you want to delete the segment. |
segmentId | You must provide the id of the segment you want to delete. |
Templates
Templates make it easy for your clients to send great looking SMS, Emails and Push notifications by just adding their own content. The API allows you to easily create, update and delete any number of templates for each broadcast.
When you create a message template, you specify the content and settings that you want to reuse in various components of messages that are based on the template. These components, referred to as template parts, can be the message title or subject, the message body, or both, depending on the message type.
Managing Templates
When you plan on sending a broadcast, you will usually start with designing a template, we recommend storing this design in our template system for future reuse.
Creating Templates
To create your templates, we recommend using our GUI for easy management of these templates, but if you need to use an API, check the methods below.
SMS Template [ POST /sms ]
Email Template [ POST /templates]
Push Template [ POST /push ]
SMS Template
When you create or edit SMS template, the request body contains the following data:
HTTP Request: POST /sms
Example request body
{
  "_id": "5ef50d781faf550007deb1ad",
  "tags": [],
  "highlight": false,
  "global": false,
  "name": "SMSTemplate",
  "description": "sms templated",
  "text": "Hola [[name]] !!",
  "updatedAt": "2020-07-08T01:18:05.858Z",
  "createdAt": "2020-07-08T01:18:05.858Z"
}
The parameters presented in the request body example when creating the SMS template are the following:
Parameter | Description |
|---|---|
_id | SMS Template identifier. |
tags | Tags that dynamically pull through information from your account. With tags, you can personalize your messages. |
highlight | Template category filter (not necessary field) |
global | Global SMS Template |
name | Name of the SMS Template |
description | Description of the SMS Template |
text | SMS message content |
createdAt | Creation date of the SMS template. |
updateAt | Update date of the SMS template. |
Email Template
When you create or edit Email template, the request body contains the following data:
HTTP Request: POST /templates
Example request body
{
  "_id": "5efb60891faf550007deb1b5",
  "tags": [],
  "highlight": false,
  "global": false,
  "name": "TemplateOne",
  "description": "Template Number One",
  "html": " ",
  "css": " ",
  "preview": " ",
  "createdAt": "2020-06-30T15:55:53.693Z",
  "updatedAt": "2020-06-30T15:55:53.693Z",
  "assets": []
}
The parameters presented in the request body example when creating the Email template are the following:
Parameter | Description |
|---|---|
_id | Email Template identifier. |
tags | Tags that dynamically pull through information from your account. With tags, you can personalize your messages. |
highlight | Template category filter (not necessary field). |
global | Global Email Template. |
name | Name of the Email Template. |
description | Description of the Email Template. |
html | Create a message via HTML. |
css | Create a message via CSS style. |
preview | Preview of the Email Template. |
createdAt | Creation date of the Email template. |
updateAt | Update date of the Email template. |
assets | HTML/CSS assets. |
Push Template
When you create or edit Email template, the request body contains the following data:
HTTP Request: POST /push
Example Request body
{
  "_id": "5ede56211faf550007deb137",
  "tags": [],
  "type": "plain",
  "highlight": false,
  "global": false,
  "name": "push template",
  "description": "testing emojis in push template",
  "notification": {
    "title": "hey in push ",
    "body": "hi"
  },
  "createdAt": "2020-06-08T15:15:45.681Z",
  "updatedAt": "2020-06-08T15:15:45.681Z"
}
The parameters presented in the request body example when creating the Push template are the following:
Parameter | Description |
|---|---|
_id | Push Template identifier. |
tags | Tags that dynamically pull through information from your account. With tags, you can personalize your messages. |
type | Type of template to simplify searches. |
highlight | Template category filter (not necessary field). |
global | Global EMAIL Template. |
name | Name of the Push Template. |
description | Description of the Push Template. |
notification | title: Title of the Push message. body: Push message content. Image: Image Push Template |
createdAt | Creation date of the Push template. |
updatedAt | Update date of the Push template. |
Preparing templates before sending a broadcast
To prepare the broadcast, the first step is to obtain the text that will be sent. The text can be added directly in the broadcast but we recommend storing the messages in the templates to facilitate future reuse.
Get SMS Template
SMS Template just stores a simple text message.
HTTP Request : GET /sms/{id}
To get a SMS Template, you need to provide the unique identifier of the SMS Template you want to retrieve the information.
Required parameter | Description |
|---|---|
id | You must provide the id of the SMS Template to get the details of a single instance of a SMS Template. |
Get Email Template
Emails have an additional resource called Draft, this resource is the final representation of the message that will be sent to subscribers, it can be generated from a template or from scratch, it is always advisable to store the draft before any email delivery since through draft we provide the functionality of inline your css and make images compatible with most email clients.
For preparing a Email Broadcast we recommend follow this steps:
Get Email Template
Get the details of a single instance of a EMAIL Template.
HTTP Request : GET /templates/{id}
To get an Email Template, you need to provide the unique identifier of the Email Template you want to retrieve the information.
Required Parameter
Description
id
You must provide the id of the Email Template to get the details of a single instance of an Email Template.
Create Draft from template (or from scratch)
Creates a new instance of an Email Draft.
HTTP Request : POST /drafts
Example request body
{
  "_id": "5f3401761faf550007deb1f3",
  "template": "5efb60891faf550007deb1b5",
  "html": " ",
  "css": " ",
  "updatedAt": "2020-08-12T14:49:26.643Z",
  "createdAt": "2020-08-12T14:49:26.643Z",
  "assets": []
}
The parameters presented in the request body example when creating the new instance of an Email Draft are the following:
Parameter
Description
_id
Email draft identifier.
html
Message draft via HTML.
css
Message draft via CSS style.
assets
HTML/CSS assets.
updatedAt
Update date of the Email draft.
createdAt
Creation date of the Email draft.
Get HTML from Draft
HTTP Request : GET /drafts/{id}
To get an Email Draft, you need to provide the unique identifier of the Email Draft you want to retrieve the information.
Required Parameter
Description
id
You must provide the id of the Email draft to get the details of a single instance of an Email draft.
Get Push Template
Push Template returns a notification object with title and body, also you can add a data object with extra payload to send.
HTTP Request : GET /push/{id}
To get a Push Template, you need to provide the unique identifier of the Push Template you want to retrieve the information.
Required parameter | Description |
|---|---|
id | You must provide the id of the Push Template to get the details of a single instance of a Push Template. |
Broadcast
A Broadcast campaign is a messaging service that allows sending messages to specific distribution groups delivered via SMS, Email, or Push.
Broadcasts serve as a way to accelerate the flow of data and information across a company or a large network of members. Organizations make use of broadcasts to communicate en-masse. This enables enterprise companies to relay important messages to their customers for informational or marketing purposes.
Sending a Broadcast
You can send three types of Broadcast:
SMS
Email
Push notification
Main identifier for the broadcast
The status of the delivery channel SMS, EMAIL, PUSH:
SMS | Description |
|---|---|
"Microsession NW - SMS now" | Send SMS message Now |
"Microsession NW - SMS scheduled" | Send SMS message Scheduled |
"Microsession NW - SMS later" | Send SMS message Pending |
Description | |
|---|---|
"Microsession NW - EMAIL now" | Send EMAIL message Now |
"Microsession NW - EMAIL scheduled" | Send EMAIL message Scheduled |
"Microsession NW - EMAIL later" | Send EMAIL message Pending |
PUSH | Description |
|---|---|
"Microsession NW - PUSH now" | Send PUSH message Now |
"Microsession NW - PUSH scheduled" | Send PUSH message Scheduled |
"Microsession NW - PUSH later" | Send PUSH message Pending |
Sending a SMS Broadcast
When you create SMS Broadcast, the response body contains the basic data of the broadcast created:
HTTP Request : POST /broadcasts
Example response body
{
   "deliveryMethod": "SMS",
   "campaignName": "Microsession NW - SMS now",
   "description": "Microsession NW - SMS now",
   "listId": 829,
   "listField": "mobile",
   "filters": "mobile%5Blike%5D=+",
   "filterName": "only mobile numbers",
   "message": "Hola [[name]]. Hasta luego",
   "origin": "14155824559",
   "scheduleWithoutDate": false,
   "throttle": 250,
   "emailField": "email",
   "requestDR": true
}
The parameters presented in the response body example when creating the SMS Broadcast are the following:
Parameter | Description |
|---|---|
deliveryMethod | Define The Delivery Channel. Available delivery channels are SMS, EMAIL or PUSH. In this case the delivery channel is SMS. |
campaignName | Define a Broadcast Name. Name of the campaign, used as the main identifier for the broadcast. |
description | Define the Description of the delivery channel. |
listId | Define the List identifier and the Recipients of your Broadcast. The id of the list that you want to send the message. The recipients can be:
|
listField | Define the List Field. Type of delivery channel. |
filters | Define the Filters. Filter that you want to apply on the message. |
filterName | Define the Filter Name. The content is the name of the filter that you want to apply on the message. |
message | Define the Content of Broadcast. Delivery Channel SMS is a plain text. |
origin | Define the origin of Broadcast. Delivery Channel SMS is a valid code. |
scheduleWithoutDate | Define the Date & Time. Time of your Broadcast. To define broadcast date you have two main options:
|
throttle | Message delivery speedometer. For example, 250 messages are sent per second. |
emailField | Define Additional user information. Optionally, you can include these fields:
These additional fields help connect the information for your reports. |
requestDR | Request delivery receipt ( Yes “true” or “false “no” ) |
Sending an Email Broadcast
When you create Email Broadcast, the response body contains the basic data of the broadcast created:
HTTP Request : POST /broadcasts
Example response body
{  "deliveryMethod": "EMAIL",
   "campaignName": "Microsession NW - EMAIL now",
   "description": "Microsession NW - EMAIL now",
   "listId": 829,
  "listField": "email",
  "filters": "email%5Blike%5D=@",
  "filterName": "only emails",
  "message": " ",
  "origin": "noreply-staging@messangi.me",
  "scheduleWithoutDate": false,
  "throttle": 160,
  "smsField": "mobile",
  "subject": "Microsession NW - EMAIL now"
}
The parameters presented in the response body example when creating the Email Broadcast are the following:
Parameter | Description |
|---|---|
deliveryMethod | Define The Delivery Channel. Available delivery channels are SMS, EMAIL or PUSH. In this case the delivery channel is EMAIL. |
campaignName | Define a Broadcast Name. Name of the campaign, used as the main identifier for the broadcast. |
description | Define the Description of the delivery channel. |
listId | Define the List identifier and the Recipients of your Broadcast. The id of the list that you want to send the message. The recipients can be:
|
listField | Define the List Field. Type of delivery channel. |
filters | Define the Filters. Filter that you want to apply on the message. |
filterName | Define the Filter Name. The content is the name of the filter that you want to apply on the message. |
message | Define the Content of Broadcast. Delivery Channel EMAIL it is an HTML code and has an additional field subject. |
origin | Define the origin of Broadcast. Delivery Channel EMAIL is a valid from (email sender). |
scheduleWithoutDate | Define the Date & Time of your Broadcast. To define broadcast date you have two main options:
|
throttle | Message delivery speedometer. For example, 250 messages are sent per second. |
emailField | Define Additional user information. Optionally, you can include these fields:
These additional fields help connect the information for your reports. |
subject | Define the Subject of the Broadcast. Add subject field of the delivery channel, used as the main identifier for the broadcast. |
Sending a Push Broadcast
When you create Push notification Broadcast, the response body contains the basic data of the broadcast created:
HTTP Request : POST /broadcasts
Example response body
{
  "deliveryMethod": "PUSH",
  "campaignName": "Microsession NW - PUSH now",
  "description": "Microsession NW - PUSH now",
  "listId": 829,  "listField": "devices",
  "filters": "devices%5Blike%5D=pushToken",
  "filterName": "only users with devices",
  "message": "Hola [[name]]. Hasta luego ",
  "scheduleWithoutDate": false,
  "throttle": 1200,
  "smsField": "mobile",
  "emailField": "email",
  "appName": "application Name",
  "title": "Hola [[name]]. Hasta luego ",
  "android": {
  "credentialId": "5f8d92cc2b39611dbd528646"
  }
}
The parameters presented in the response body example when creating the Push notification Broadcast are the following:
Parameter | Description |
|---|---|
deliveryMethod | Define The Delivery Channel. Available delivery channels are SMS, EMAIL or PUSH. In this case the delivery channel is PUSH. |
campaignName | Define a Broadcast Name. Name of the campaign, used as the main identifier for the broadcast. |
description | Define the Description of the delivery channel. |
listId | Define the List identifier and the Recipients of your Broadcast. The id of the list that you want to send the message. The recipients can be:
|
listField | Define the List Field. Type of delivery channel. |
filters | Define the Filters. Filter that you want to apply on the message. |
filterName | Define the Filter Name. The content is the name of the filter that you want to apply on the message. |
message | Define the Content of Broadcast. Delivery Channel PUSH it is a Notification object that includes title and text, it can also include additional data |
origin | Define the origin of Broadcast. Delivery Channel PUSH is an ApplicationID registered on our system. |
scheduleWithoutDate | Define the Date & Time of your Broadcast. To define broadcast date you have two main options:
|
throttle | Message delivery speedometer. For example, 250 messages are sent per second. |
smsField / emailField | Define Additional user information. Optionally, you can include these fields:
These additional fields help connect the information for your reports. |
appName | Application name |
Title | Title of the Push notification Broadcast |
SMS
SMS API helps you to fetch or receive reports on your endpoint in real time, ability to see message logs and add robust messaging capabilities to your applications.
Send SMS with low or high speed delivery times.
Receive SMS using local numbers.
Configure the regional telephone codes for sending SMS messages.
Take your global SMS messaging to the next level with a platform built for scale, speed, and deliverability.
Send and receive text messages (SMS) worldwide using our API in an easy and simple way to use!
Sending a SMS
These instructions describe how you can send your first SMS message! Using cURL calls.
Before you can start using the SMS API, you need to complete the following steps:
Get access credentials (API Key).
Have cURL installed in your machine.
Build you API call
Your API call must have the following components:
A host -> The host requests are always : https://elastic.messangi.me/
An Authorization header -> Your API Key must be included in the Authorization header.
A request -> When submitting data to a resource via POST or PUT, you must submit your payload in JSON.
Note
Every time the total number of characters is exceeded (160 characters), the SMS counter will be incremented.
Send your SMS using the API
The steps to send an SMS message using the SMS API are the following:
Request body
curl -X POST "https://elastic.messangi.me/raven/v2/messages" -H "accept: application/json" -H "Authorization: Bearer <YOUR_API_KEY>" -H "Content-Type: application/json" -d "{\"from\":\"12345\",\"text\":\"text demo\",\"to\":\"+580000000005\",\"type\":\"MT\"}"Copy the curl example above.
Paste the curl call into your favorite text editor.
Copy your API key and paste it in the "Authorization" header.
In the data section, specify the "from" (virtual code), "text" (text message), "to" (mobile number of the recipient) and “type” (MT or MO messaging).
Copy the code and paste it in your terminal command.
Press Enter.
Check the response body and verify the SMS message sent “to” your recipient.
All responses are returned in JSON format. We specify this by sending the Content-Type header.
Create rich, personalized marketing and transactional emails, and send them via Email API to capture your customers’ attention.
The Email API gives you the ability to send emails at scale. Use your API key to take the stress out of email marketing, with features such as:
Email delivery monitoring and optimization
The ability to edit the email body in HTML.
Send SMS with low or high speed delivery times.
Sending an Email
These instructions describe how you can send your first email message! Using cURL calls.
Before you can start using the Email API, you need to complete the following steps:
Get access credentials (API Key).
Have cURL installed in your machine.
If you want to send bulk emails, a sender email is required. You need to contact your account manager to verify an email address.
Amazon sends you an email providing the authorization to send bulk messages through your email address
Click on the URL link on the email to verify your email
Congratulations you can now start sending emails using your verified email address as the sender.
Build your API call
Your API call must have the following components:
A host -> The host requests are always : https://elastic.messangi.me/
An Authorization header -> Your API Key must be included in the Authorization header.
A request -> When submitting data to a resource via POST or PUT, you must submit your payload in JSON.
Send your Email using the API
The steps to send an email message using the Email API are the following:
Request body
curl -X POST "https://elastic.messangi.me/crowsnest/v2/emails" -H "accept: application/json" -H "Authorization: Bearer <YOUR_API_KEY>" -H "Content-Type: application/json" -d "{\"to\":\"email@service.com\",\"from\":\"service@service.com\",\"text\":\"example text\",\"subject\":\"Email Subject\",\"externalId\":\"123456789abcde\",\"clientId\":\"48118112\",\"callbacks\":[\"string\"]}"Copy the curl example above.
Paste the curl call into your favorite text editor.
Copy your API key and paste it in the "Authorization" . In the example above, replace <YOUR_API_KEY> with your API Key.
In the data section, specify the following parameters :
Parameter
Description
to
Email address of the recipient
from
Email address of the sender
text
Content of the email. This can be a simple text or HTML format.
subject
Subject of the email
externalId
Alphanumeric identifier that can be used for reporting purposes. For instance, you could set the name or ID of the action that originated this email so you can then identify where this API call is coming from.
Note
This is optional and can be removed from the API call if not needed.
clientId
Unique user identifier that can be used for reporting purposes. For instance, you could set the mobile number of the user receiving the email so you can then relate this email sent with a particular user.
Note
This is optional and can be removed from the API call if not needed.
callbacks
You can indicate one or more (separated by comma) webhook URLs to notify about the status of the email delivery.
Note
This is optional and can be removed from the API call if not needed.
Copy the code and paste it in your terminal command.
Press Enter.
Check the inbox of the address you specified as the "to" email and see your message!
All responses are returned in JSON format. We specify this by sending the Content-Type header.
Subscription Management
Subscription Management enables the automation of the process of retrieving responses sent by customers to the messages that you sent to them. For this reason, it allows the creation of processes to interact with users through two delivery channels: SMS or Email.
The term MO message stands for “mobile originated” messaging. This type of message refers to a message sent from a mobile phone. More precisely, this is a message that customer/subscriber sends from mobile phone to mobile marketing and mobile SMS provider through the SMS platform. Therefore, the main function of Subscription Management is to process the MO.
A process in Subscription Management basically receives messages from a user (SMS or Email), evaluates them and the messages are redirected to another process depending on the result.
Subscription Management contains three processes:
Forward
Filter
Subscription
Managing Forwards
The Digital Engagement API platform provides the ability to route incoming messages destined for an external service that processes those messages with your business rules. Finally, the messages can be sent back through the platform. This process is called Forward.
Creating Forward Processes
You are able to create a new Forward process through two delivery channels:
SMS
Email
This process allows you to publish alerts in callbacks or queues.
SMS Forward
When you create or update a SMS Forward process, the request body contains the following data:
HTTP Request : POST / forwards
Example request body
{
   "description": "Process description",
   "channel": "SMS",
   "keyword": "(?i)(stop)",
   "origins":  [
     "MESSANGI"
    ],
   "active": true,
   "response": "You were unsubscribed successfully",
   "subject": "You were unsubscribed successfully",
   "name": "Process name",
   "keywords": [
     "keyword"
    ],
   "priority": 500,
   "url": "http://www.mycallback.com",
   "prefix": "ABC",
   "queue": {
     "name": "queue",
     "exchange": "exchange"
   }
}
The parameters presented in the request body example when creating the SMS Forward process are the following:
Parameter | Description |
|---|---|
description | Process description. |
channel | Type of text messages (SMS) that will be processed. |
keyword | Keyword to interact with the process, in case you want any word use : ". *" (Regular expression). Specify the Keyword through regular expressions. |
origins | Codes where the MO messages come from. |
active | The Forward process is active “true”. |
response | Reply the message. |
subject | Subject of the forward process. |
name | Process name. |
keywords | Establish from one or more keywords (list). |
priority | Priority of the process over others for the same user. Default value is 500 |
url | Callback where the user information who participated in the process will be published. The MOs that are processing you publish them in a specific callback. |
prefix | if you have the same keyword and origin value in two or more processes, the prefix establishes what process it will enter. |
queue | Contains the information of the queue to be published. |
name | Name of the queue. |
exchange | Queue exchange. |
When you created the forward process, the response body contains the following data:
Example response body
{
   "meta": {
     "timestamp": 1597166699457,
     "transactionId": "70169d77-c165-4795-9932-35b8a3af96fb",
     "explain": "a descriptive text"
   },
   "data": {
     "id": 10,
     "description": "Process description",
     "channel": "SMS",
     "keyword":
     "(?i)(stop)",
     "origins": [
       "MESSANGI"
     ],
     "active": true,
     "response": "You were unsubscribed successfully",
     "subject": "You were unsubscribed successfully",
     "name": "Process name",
     "keywords": [
       "keyword"
     ],
     "priority": 500,
     "url": "http://www.mycallback.com",
     "prefix": "ABC",
     "queue": {
       "name": "queue",
       "exchange": "exchange"
     },
     "owner": "root",
     "operator": "root"
   }
}
We only describe the additional parameters that are generated when making the request.
To consult each description parameter (not additional parameters) displayed in the response body example, go to the parameters presented in the request body example when creating the SMS Forward process.
The additional parameters presented in the response body example when creating the forward process are the following:
Parameter | Description |
|---|---|
data | Data contained in the forward process. |
id | Unique identifier of the forward process. |
owner | Owner of this forward process |
operator | Operator of this forward process |
Updating Froward
In order to update a Forward process PUT method might be used. Note that PUT method is going to REPLACE the current data of the forward process for the data sent in the request (meaning fields not sent are going to be erased from the forward process).
Updates a forward process with the state defined by the representation enclosed in the request:
HTTP Request : PUT /forwards/ {id}
To update a forward process, you need to provide the unique identifier of the forward process you want to update.
Required Parameter | Description |
|---|---|
id | The identifier of the forward process you want to edit. |
Getting Forward
You can get specific data from a Forward process previously created.
HTTP Request : GET /forwards/{id}
To get a forward process, you need to provide the unique identifier of the forward process you want to retrieve the information.
Required Parameter | Description |
|---|---|
id | You must provide the identifier of the forward process to get the details of a single instance of this process. |
Deleting Forward
You can delete a specific Forward process previously created.
HTTP Request : DELETE /forwards/{id}
To delete a forward process, you need to provide the unique identifier of the forward process you want to delete.
Required Parameter | Description |
|---|---|
id | The identifier of the forward process you want to delete. |
Example
In the following example, we are going to create a Forward process.
These instructions describe how you can create your first Forward process! Using cURL calls.
Before you can start using the Wallet API, you need to complete the following steps:
Get access credentials (API Key)
Have cURL installed in your machine
Build your API call
Your API call must have the following components:
A host -The host requests are https://elastic.messangi.me/
An Authorization header -> Your API Key must be included in the Authorization header.
A request -> When submitting data to a resource via POST or PUT, you must submit your payload in JSON.
Create a Forward process
The steps to create a forward process using the Forward API are the following:
Request body
curl -X POST "https://elastic.messangi.me/jacaerys/v1/forwards" -H "accept: application/json" -H "Authorization: Bearer <YOUR_API_KEY>" -H "Content-Type: application/json" -d "{\"description\":\"Process description\",\"channel\":\"SMS\",\"keyword\":\".*\",\"origins\":[\"6632\"],\"response\":\"Response to user\",\"name\":\"Process name\"}"Copy the curl example above.
Paste the curl call into your favorite text editor.
Copy your API key and paste it in the Authorization header.
In the data section, we recommend you to specify the description ( Brief description of the forward process ), channel ( Type of text message [SMS] ), keyword ( Specify the regular expression), origins (Codes where the MO messages come from), response ( Reply message ) and name ( Forward process name ).
Copy the code and paste it in your terminal command.
Press Enter.
Check the response body and verify the forward process created.
Copy the parameter id (Forward process ID) located in the response body for future requests.
Update a Forward process
Once the forward process is created, we proceed to change the value of some parameters.
The steps to update a forward process using the Forward API are the following:
Request body
curl -X PUT "https://elastic.messangi.me/jacaerys/v1/forwards/<FORWARD_ID>" -H "accept: application/json" -H "Authorization: Bearer <YOUR_API_KEY>" -H "Content-Type: application/json" -d "{\"description\":\"New process description\",\"channel\":\"SMS\",\"keyword\":\".*\",\"origins\":[\"6632\"],\"response\":\"New response to user\",\"name\":\"New process name\"}"Copy the curl example above.
Paste the curl call into your favorite text editor.
Copy your API key and paste it in the Authorization header.
Copy the unique identifier id of the forward process into the URL.
In the data section, we change (update) the value of two parameters:
Parameter
Old Value
New Value
response
Response to user
New response to user
name
Process name
New process name
Copy the code and paste it in your terminal command.
Press Enter.
Check the response body and verify the forward process updated.
Copy the parameter id (Forward process ID) located in the response body for future requests.
Get a Forward process
Once the forward process is created, we proceed to get the information from a single forward process.
The steps to update a forward process using the Forward API are the following:
Request body
curl -X GET "https://elastic.messangi.me/jacaerys/v1/forwards/<FORWARD_ID>" -H "accept: application/json" -H "Authorization: Bearer <YOUR_API_KEY>"
Copy the curl example above.
Paste the curl call into your favorite text editor.
Copy your API key and paste it in the Authorization header.
Copy the unique identifier id of the forward process into the URL.
Copy the code and paste it in your terminal command.
Press Enter.
Check the response body and verify the details of the forward process.
Copy the parameter id (Forward process ID) located in the response body for future requests.
Delete a Forward process
Once the forward process is created, we proceed to delete the forward process.
The steps to delete a forward process using the Forward API are the following:
Request body
curl -X DELETE "https://elastic.messangi.me/jacaerys/v1/forwards/<FORWARD_ID>" -H "accept: application/json" -H "Authorization: Bearer <YOUR_API_KEY>"
Copy the curl example above.
Paste the curl call into your favorite text editor.
Copy your API key and paste it in the Authorization header.
Copy the unique identifier id of the forward process into the URL.
Copy the code and paste it in your terminal command.
Press Enter.
Check the response body and verify the forward process deleted.
Copy the parameter id (Forward process ID) located in the response body for future requests.
Mobile Wallet
Mobile Wallet Passes are items with content or information stored in the Apple Wallet or Google Pay (formerly Android Pay / Google Wallet) native Applications. They are the equivalent of things stored in a physical wallet, such as loyalty cards, coupons, business cards, tickets, credit cards and more. Wallet Passes are very effective and efficient for businesses because they can be easily created, managed and updated, allowing a business to significantly reduce the cost of printing traditional physical cards.Passes can be thought of as another means of engagement and communication that can be sent to your audience.
The Wallet API provides functions to create, read, update, delete passes. Additionally there are functions to get a list of pass-templates and existing passes. Creating and updating wallet templates is currently supported via the API.
Apple and Google took different approaches at architecting their mobile wallet solutions even though what users experience is pretty much the same. For instance, Apple passes are pkpass files that must be bundled and hosted by issuers whereas Google takes care of that but only behind a cumbersome web interface.
The steps to create and download a wallet pass are the following:
Create the Wallet Pass template.
Create the Wallet Pass
Download the Wallet Pass
Creating Wallet Template
Create a Wallet Template and send on payload the wallet template object in JSON format.
Stores a Wallet template in the server using a JSON object data.
You can specify the layout of the pass you want to create by adding functions you require such as accumulate points, personalize the pass depending on the user, generate dynamic QR codes for the particular order, add different types of images, among others.
The Wallet API allows you to specify five pass styles:
Boarding pass
A mobile boarding pass is a digital document provided by transit organizations to board the airplane, train or bus. The pass includes a QR code which allows the passenger to easily board by showing the mobile QR code at the security checkpoints before boarding time. Each pass usually corresponds to a single trip with a specific starting and ending point.
Coupon
The coupon is a digital ticket that can be redeemed for a financial discount or rebate when purchasing a product. With this type of pass you can offer discounts, offers and promotions to your customers. The growing popularity of ecommerce has greatly contributed to the rise of coupon codes. This form of discount is easier for the customer to complete at the point of sale.
Event ticket
The Wallet API ensures optimal processing creation of bulk event tickets. It does not matter whether these are entertainment, cultural or sporting events. With the help of pass style. you can provide your clients with an efficient, fast, safe and easy way to use when accessing any type of event without any extras.
Store card
The digital store card is used to record the credit points granted by stores or commercial organizations . These points can then be redeemed on future purchases for rewards, like discounts on purchases or free gifts. Not only that, but customers can also accumulate points to redeem for bigger rewards. That can incentivize your customers to make several purchases in a row, in order to get the fancier reward - and that means they're coming to you more often.
Generic pass
This pass style allows you to personalize your own pass by adding fields and images to the wallet template.When viewed by a user, the pass looks like a simple card , with a front side and a back side. You can use it to create membership cards or claim tickets.
When you create or update a wallet template, the request body contains the following data:
HTTP Request : POST /wallet/templates
Example request body
{
  "name": "test Template doc",
  "passTypeId": "pass.com.messangi.dev",
  "type": "storecard",
  "description": "A wallet pass storecard example",
  "organization": "My Organization Name",
  "googlePayCompatible": false,
  "fields": [
    {
      "place": "PRIMARY",
      "label": "f label",
      "fixed": true,
      "value": "f value"
    }
  ],
  "images": [
    {
      "name": "logo",
      "fixed": true
    }
  ],
  "visualInfo": {
    "labelColor": "#e80202",
    "backgroundColor": "#66c1d1",
    "foregroundColor": "#ffffff",
    "transitType": "GENERIC",
    "logoText": "text next to the logo",
    "logoTextFixed": true,
    "barcode": {
      "type": "QR",
      "content": "encoded message",
      "altText": "plain text alternative",
      "contentFixed": true,
      "altTextFixed": true
    }
  },
  "relevanceInfo": {
    "relevantDate": "2020-08-07T17:40:23Z",
    "expirationDate": "2020-09-06T17:40:23Z",
    "maxDistance": 22,
    "voided": false,
    "locations": [
      {
        "altitude": 0,
        "latitude": 37.43900253544606,
        "longitude": -122.1458918105788,
        "relevantText": "location text"
      },
      {
        "altitude": 0,
        "latitude": 53.33986779999998,
        "longitude": -6.236224399999969,
        "relevantText": "another location text"
      }
    ],
    "beacons": [
      {
        "uuid": "3f8a693b-44e7-4f4d-a438-9dabca739fd5",
        "major": 100,
        "minor": 10,
        "text": "beacon text",
        "fixed": true
      },
      {
        "uuid": "6e40dd17-c5e6-4abe-ad1b-574f0c699c3a",
        "major": 150,
        "minor": 20,
        "text": null,
        "fixed": false
      }
    ],
    "nfc": {
      "message": "nfc message",
      "publicKey": "encryption_public_key"
    }
  },
  "appKeys": {
    "appLaunchURL": "http://www.google.com",
    "storeIds": [
      123,
      123,
      343535
    ],
    "userInfo": {
      "a_key": "a_value",
      "2_key": {
        "an_object": "a_value",
        "a_date": "2019-04-15T16:22:40Z"
      }
    }
  }
}
When you created the wallet template, the response body contains the following data:
Example response body
{
   "meta": {
     "timestamp": 1609267674639,
     "transactionId": "84bd69d5-15a1-470d-9250-ead476515468"
   },
   "data": {
     "serial": "5feb79da87ea693c978e9956",
     "passTypeId": "pass.com.messangi.dev",
     "name": "Example Store card",
     "type": "storecard",
     "description": "Wallet pass storecard example",
     "organization": "SmallYuGi7",
     "googlePayCompatible": false,
     "creationDate": "2020-12-29T18:47:54.593707",
     "lastUpdated": "2020-12-29T18:47:54.593707",
     "createdBy": "hey07@example.com"
   }
}
The parameters presented in the request body example when creating the wallet template are the following:
Parameter | Description |
|---|---|
name | Template name. |
passTypeId | Unique identifier of the pass type template. Used to distinguish pass types. |
type | Template pass type. Valid pass styles: storecard, event, boarding, coupon, generic. |
description | A brief description of your passes’s intent. Used by end device accessibility technologies. |
organization | Identifies your brand inside the pass. |
googlePayCompatible | Defines if this template pass type also generates GooglePay passes. |
fields | Template fields |
place | Valid field places on a pass: PRIMARY, SECONDARY, AUXILIARY, HEADER. |
label | Field label text on a pass. |
fixed | Fixed [fields] : Whether the field value is fixed for all recipients. Fixed [images] : Defines if the image is fixed for all recipients. Fixed [beacons]: Whether the text is fixed or varies for each recipient. |
value | If the fixed parameter is ‘True’, you need to specify the field value. |
images | Template images |
name | Image name. Valid names are: icon, logo, strip, footer, background, thumbnail, main and hero. |
visualInfo | Visual style attributes of passes. |
labelColor | Field label text color on passes, in hex format. |
backgroundColor | Background color of passes, in hex format. |
foregroundColor | Field value text color on passes, in hex format |
transitType | Transit type identifier, used only by boarding passes. Valid types are: AIR, BUS, BOAT, TRAIN and GENERIC. |
logoText | Text displayed next to the logo on Apple passes. |
logoTextFixed | Whether the logoText is fixed or varies for each recipient. |
barcode | Barcode type used on passes. |
type | Barcode type used on passes. Supported barcode types are: QR, Aztec, PDF-417 and Code128. |
content | String encoded in the barcode |
altText | Text displayed below the barcode. |
contentFixed | Whether the content is fixed or varies for each recipient. |
altTextFixed | Whether the alternate text is fixed or varies for each recipient. |
relevanceInfo | Relevance attributes of passes. Devices may display passes on the lockscreen or notify users based on these. |
relevantDate | Date and time on which passes are Relevant. In ISO8601 format. |
expirationDate | Date and time on which passes expire. In ISO8601 format. |
maxDistance | Max distance in meters from any location where the pass is Relevant. |
voided | Set this flag to true to produce voided or expired passes (same effect as expiration date). Useful for single-use coupons/cards. Default: false. |
locations | List of locations where passes are Relevant. |
altitude | Location altitude in meters. |
latitude | Location latitude in degrees. |
longitude | Location longitude in degrees. |
relevantText | Text to display on a location. |
beacons | List of IBeacons near which passes are Relevant. |
uuid | The UUID is a standard identifying system which allows a 'unique' number to be generated for a device. The purpose of the ID is to distinguish iBeacons in your network, from all other beacons in networks outside your control. |
major | Major identifier. |
minor | Minor identifier. |
text | Text to display nearby a beacon. |
appKeys | Associated and Custom companion app information for passes. |
appLaunchURL | App Launch URL for the specified companion apps store ids. |
storeIds | Array of numeric Apple App Store Ids. |
userInfo | Custom user info for companion apps. Any JSON data can be stored. |
Note
The following parameters presented in the example request body (fields, images, visualInfo, relevanceInfo, appKeys) are not presented in the example response body to avoid duplicating them in the call.
The parameters presented in the response body example when creating the wallet template are the following:
Parameter | Description |
|---|---|
data | Data contained in the wallet template. |
serial | Unique identifier of the template. |
creationDate | Template creation timestamp. |
lastUpdated | Timestamp of the last template update. |
createdBy | User who created the template. |
Updating Wallet Template
Partially update an existing Wallet Template data and send on payload the wallet template object in JSON format.
You can edit a specified wallet template that was created previously. With this call, you can also add or remove fields from the wallet template. One of the special fields you can add are the images. The images help you to set the overall visual appearance and improve the layout, style and notification of the pass in order to be more intuitive to the end user.
Note
With this call, you do not need to provide a complete template object when updating a template.
Eight types of images are presented you can add to the wallet template style:
Image | Details |
|---|---|
logo | In iOS, the logo image is displayed in the top left corner of the pass, next to the logo text. Dimensions : 480 pixels wide x 150 pixels high. In Android, is displayed in the top middle of the pass. Dimensions: The minimum size of the logo on the Google Pay pass is 660 x 660 pixels. |
icon | The icon image is shown when a Push Notification is received from the Wallet Pass in the user’s lock screen. Dimensions : 87 pixels wide x 87 pixels high |
strip | The strip image is displayed beneath the logo. Dimensions : 1125 pixels wide by 432 pixels high. |
footer | The footer image is displayed near the barcode. Dimensions : 381 pixels wide x 20 pixels high. |
background | The background image is displayed behind the entire front side of the Wallet pass. Dimensions : 240 pixels wide x 293 pixels high. |
thumbnail | The thumbnail image displayed next to the fields on the front of the pass. Dimensions : 270 pixels wide x 270 pixels high. |
hero | The hero image is used only on google pay passes. Dimensions : 1032 pixels wide by 336 pixels high. |
main | The main image is used only on google pay passes. 1500 x 1536 |
Images previously described are taken into account based on the images attribute.
Supported image formats are PNG.
Images supported by each pass style:
Pass style | Supported images |
|---|---|
Boarding pass | logo, icon, footer |
Coupon | logo, icon, strip |
Event ticket | logo, icon, strip, background, thumbnail. If you specify a strip image, do not specify a background image or a thumbnail. |
Store card | logo, icon, strip |
Generic pass | logo, icon, thumbnail |
There are four types of Barcodes to be used inside of Wallet Passes supported by the Wallet API:
Barcode Type | Example | |
|---|---|---|
QR |
| |
Aztec |
| |
PDF-417 |
| |
Code128 |
|


Wallet Pass example:
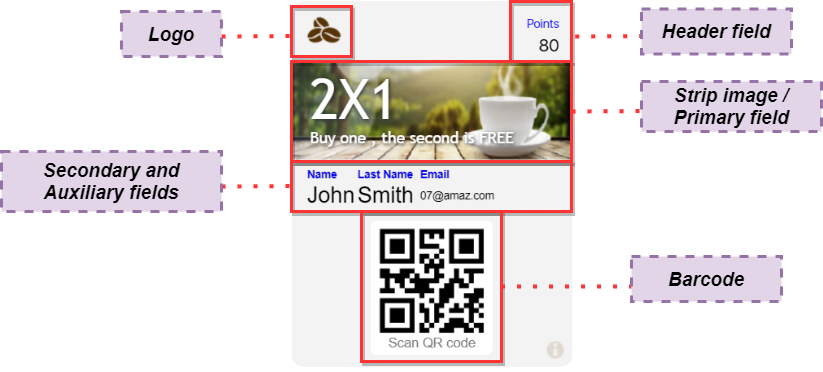 |
The information shown on a pass is broken up into fields. Each field is defined by a dictionary, which gives it a value and label (which are displayed to the user), a unique key, and optional information about how its value should be formatted.
Field type | Description |
|---|---|
Primary fields | The primary fields contain the most important information and are shown prominently on the pass. |
Secondary fields | The secondary fields are less important and less prominent. |
Auxiliary fields | Auxiliary fields are even less important than secondary fields. |
Header fields | The header fields contain highly salient information, and they are the only field that is visible when the passes are stacked up in Wallet. |
Back fields | The fields behind the pass are called backfields. |
The field values can be unique or non-unique, depending on the pass style. For example, the Auxiliary field value is "email" and you want the "email" value to be personalized for each pass that is generated, which means that value will not be static for each pass to generate.
The pass style determines the maximum number of fields that can appear on the front of a pass:
A pass can have up to three header fields, a single primary field, up to four secondary fields, and up to four auxiliary fields.
Boarding passes can have up to two primary fields and up to five auxiliary fields.
Coupons, store cards, and generic passes with a square barcode can have a total of up to four secondary and auxiliary fields, combined.
If you want to consult the structure of the call to create the Wallet Template, go to Creating Wallet Template section.
HTTP Request : PATCH /wallet/templates/{serial}
To update the Wallet Template, the same structure is used as the creation of the wallet template where the relevant data is the identifier ( serial ).
You need to provide the unique identifier of the wallet template you want to update.
Required Parameter | Description |
|---|---|
serial | The unique identifier of the Wallet Template. |
Creating Wallet Pass
Create Wallet Passes and send on payload the wallet pass object in JSON format.
Stores Wallet Passes in the server using a JSON object data.
When you create one or more new passes, you only need to specify the unique values placed in the previously created wallet template layout.
Create new wallet passes based on the Apple and Google json keys defined in your wallet template and access them from a URL link.
HTTP Request : POST /wallet/templates/{serial}/passes/batch
It should be remembered, the unique values of the fields are personalized for each pass generated. For example: if the "Name" value is unique for each user who receives the pass, the unique value “Name” must be entered in the request body in JSON format.
When you create or update one or more wallet passes, the request body contains the following data:
Example response body
[
 {
  "recipientId": "135dfc97-942a-42de-8a04-b22b732e682g",
  "uniqueValues": {
    "fields": [
      {
        "place": "PRIMARY",
        "label": "FullName",
        "value": "John Doe"
      }
    ],
    "images": [
      {
        "name": "logo",
        "url": "https://www.messangi.com/wp-content/uploads/2019/04/Logo-Black@300x-360x122.png"
      }
    ],
    "barcode": {
      "altText": "my VAR altText",
      "content": "my VAR content"
    },
    "locations": [
      {
        "altitude": 0,
        "latitude": 37.43900253544606,
        "longitude": -122.1458918105788,
        "relevantText": "location text"
      },
      {
        "altitude": 0,
        "latitude": 53.33986779999998,
        "longitude": -6.236224399999969,
        "relevantText": "another location text"
      }
    ],
    "beacons": [
      {
        "uuid": "6e40dd17-c5e6-4abe-ad1b-574f0c699c3a",
        "major": 100,
        "minor": 10,
        "text": "my custom beacon text"
      }
    ]
  }
 }
]
When you created one or more wallet passes, the response body contains the following data:
Example response body
{
  "meta": {
    "timestamp": 1597166699457,
    "transactionId": "70169d77-c165-4795-9932-35b8a3af96fb",
    "explain": "a descriptive text"
  },
  "items": [
    {
      "recipientId": "string",
      "url": "string"
    }
  ]
}
To create the passes, you need to provide the unique identifier of the wallet template you want to create.
Required Parameter | Description |
|---|---|
serial | The unique identifier of the Wallet Template. |
The parameters presented in the request body example when creating the wallet passes are the following:
Parameter | Description |
|---|---|
recipientId | A JSON object containing a recipientId (to relate the pass with an id of the recipient’s data on your side). Id you provide for the recipient, preferably the id of a record holding pass custom data on your side. |
uniqueValues | Specify the unique values. |
fields | Template fields. |
place | Valid field places on a pass: PRIMARY, SECONDARY, AUXILIARY, HEADER. |
label | Field label text on a pass. |
value | If the fixed parameter is ‘True’, you need to specify the field value. |
images | Template images. |
name | Image name. |
url | URL of a image |
barcode | Barcode type used on passes. |
altText | Text displayed below the barcode. |
content | String encoded in the barcode |
locations | List of locations where passes are Relevant. |
altitude | Location altitude in meters. |
latitude | Location latitude in degrees. |
longitude | Location longitude in degrees. |
relevantText | Text to display on a location. |
beacons | List of IBeacons near which passes are Relevant. |
uuid | The UUID is a standard identifying system which allows a 'unique' number to be generated for a device. The purpose of the ID is to distinguish iBeacons in your network, from all other beacons in networks outside your control. |
major | Major identifier. |
minor | Minor identifier. |
text | Text to display nearby a beacon. |
The parameters presented in the response body example when creating the wallet passes are the following:
Parameter | Description |
|---|---|
items | The items array contains a set of passes that have been created. |
recipientId | A JSON object containing a recipientId (to relate the pass with an id of the recipient’s data on your side). Id you provide for the recipient, preferably the id of a record holding pass custom data on your side. |
url | The URL allows you to download the pass. |
Downloading Wallet Pass
When the pass is created, the end-users can download the pass and distribute it to your end users.
To be called from devices, you need to download the pass for the given template and recipient ids, providing the proper object for each platform based on its User-Agent.
Apple devices will receive the Apple Wallet pkpass file.
Android devices will be redirected to the GooglePay save link (https: //pay.google.com/gp/v/save / ...).
When the browser sends a GET request to
https://staging-aws.messangi.me/ironbank/v2/wallet/templates/{serial}/passes/{recipientId}/download
the pass gets downloaded with filename ‘{serial}.pkpass’.
HTTP Request : GET /wallet/templates/{serial}/passes/{recipientId}/download
To download the pass, you need to provide the unique identifier of the wallet template and recipient of the pass you want to download.
Required Parameter | Description |
|---|---|
serial | The unique identifier of the Wallet Template. |
recipientId | A JSON object containing a recipientId (to relate the pass with an id of the recipient’s data on your side). Id you provide for the recipient, preferably the id of a record holding pass custom data on your side. |
Example
In the following example, we are going to create a store card.
These instructions describe how you can create your first Wallet Template! Using cURL calls.
Before you can start using the Wallet API, you need to complete the following steps:
Get access credentials (API Key)
Have cURL installed in your machine
Build your API call
Your API call must have the following components:
A host -> The host requests are https://staging-aws.messangi.me/
An Authorization header -> Your API Key must be included in the Authorization header.
A request -> When submitting data to a resource via POST or PUT, you must submit your payload in JSON.
Create a Wallet Pass Template
The steps to create a wallet pass template of a store card using the Wallet API are the following:
Request body
curl -X POST "https://staging-aws.messangi.me/ironbank/v2/wallet/templates" -H  "accept: application/json" -H  "Authorization: Bearer <YOUR_API_KEY>" -H  "Content-Type: multipart/form-data" --form 'template={
"name": "Example Store card",
"type": "storecard",
"description": "Wallet pass storecard example",
"organization": "SmallYuGi7"
}'
Copy the curl example above.
Paste the curl call into your favorite text editor.
Copy your API key and paste it in the Authorization header.
In the data section, we recommend you to specify the name ( Template name ), type ( Template pass type ), description ( Brief description of the pass ) and organization ( Your brand inside the pass ) before entering the other parameters.
Copy the code and paste it in your terminal command.
Press Enter.
Check the response body and verify the wallet template created.
Copy the parameter serial (Template ID) located in the response body for future requests.
Update a Wallet Pass Template
Once the template is created, we proceed to add the parameters to create an intuitive store card pass for the user.
The steps to update a wallet pass template of a store card using the Wallet API are the following:
Request body
curl -X PATCH "https://staging-aws.messangi.me/ironbank/v2/wallet/templates/<WALLET_TEMPLATE_ID>" -H  "accept: application/json" -H  "Authorization: Bearer <YOUR_API_KEY>" -H  "Content-Type: multipart/form-data" --form 'template={
"fields": [
    {
      "place": "HEADER",
      "label": "Points",
      "fixed": "false"
    },
    {
      "place": "SECONDARY",
      "label": "Name",
      "fixed": "false"
    },
    {
      "place": "SECONDARY",
      "label": "Last Name",
      "fixed": "false"
    },
    {
      "place": "AUXILIARY",
      "label": "email",
      "fixed": "false"
    }
  ],
"images": [
    {
      "name": "logo",
      "fixed": "true"
    },
    {
      "name": "icon",
      "fixed": "true"
    },
    {
      "name": "strip",
      "fixed": "true"
    }
  ],
 "googlePayCompatible" : true,
 "visualInfo" : {
      "labelColor" : "#666666",
      "backgroundColor" : "#f3f3f3",
      "foregroundColor" : "#0000ff",
      "barcode" : {
        "type" : "QR",
        "contentFixed" : false,
        "altTextFixed" : false
        }
    }
}' --form "logo=@/mnt/c/Users/tec13/Pictures/logo.png;type=image/png" --form "icon=@/mnt/c/Users/tec13/Pictures/icon.png;type=image/png" --form "strip=@/mnt/c/Users/tec13/Pictures/strip.png;type=image/png"
Copy the curl example above.
Paste the curl call into your favorite text editor.
Copy your API key and paste it in the Authorization header.
Copy the unique identifier serial of the wallet template into the URL.
Next we add the optional fields to the curl call:
Activate pass compatibility with Google Pay
Template fields:PRIMARY, SECONDARY, AUXILIARY, HEADER.
Template images: icon, logo, strip.
Visual info: barcode [QR]
The values of the template fields and the barcode are unique.
In the data section, we recommend you to specify the fields ( Template fields ), images ( Template images ), visualInfo ( Visual information of the pass ) and googlePayCompatible ( Compatibility with Google Pay ).
Copy the code and paste it in your terminal command.
Press Enter.
Check the response body and verify the wallet template updated.
Copy the parameter serial (Template ID) located in the response body for future requests.
Create Wallet Passes
Once the template is created, we proceed to create the store card pass for two users.
The steps to create one or more wallet passes of a store card using the Wallet API are the following:
curl -X POST "https://staging-aws.messangi.me/ironbank/v2/wallet/templates/<WALLET_TEMPLATE_ID>/passes/batch" -H "accept: application/json" -H "Authorization: Bearer <YOUR_API_KEY>" -H "Content-Type: application/json;charset=UTF-8" -d "[{\"recipientId\":\"-8a04732e682g\",\"uniqueValues\":{\"fields\":[{\"place\":\"HEADER\",\"label\":\"Points\",\"value\":\"50\"},{\"place\":\"SECONDARY\",\"label\":\"Name\",\"value\":\"Sarah\"},{\"place\":\"SECONDARY\",\"label\":\"Last Name\",\"value\":\"Carter\"},{\"place\":\"AUXILIARY\",\"label\":\"email\",\"value\":\"sh0707@amazCCw.com\"}],\"barcode\":{\"altText\":\"my VAR altText\",\"content\":\"my VAR content\"}}},{\"recipientId\":\"135dfc977382g\",\"uniqueValues\":{\"fields\":[{\"place\":\"HEADER\",\"label\":\"Points\",\"value\":\"20\"},{\"place\":\"SECONDARY\",\"label\":\"Name\",\"value\":\"Joshua\"},{\"place\":\"SECONDARY\",\"label\":\"Last Name\",\"value\":\"Albarn\"},{\"place\":\"AUXILIARY\",\"label\":\"email\",\"value\":\"ja089218@amazCCw.com\"}],\"barcode\":{\"altText\":\"my VAR altText\",\"content\":\"my VAR content\"}}}]"Copy the curl example above.
Paste the curl call into your favorite text editor.
Copy your API key and paste it in the Authorization header.
Copy the unique identifier serial of the wallet template into the URL.
Next we add the unique values to the curl call:
Template fields : PRIMARY, SECONDARY, AUXILIARY, HEADER.
Visual info: barcode [QR]
In the data section, specify the recipientId ( unique identifier of the recipient ), uniqueValues ( unique values ), fields ( template fields which are unique ) and barcode ( barcode which is unique ).
Copy the code and paste it in your terminal command.
Press Enter.
Check the response body and verify the wallet template updated.
In the response body, you can download the passes by copying every value of the url parameter and placing it in the browser the pkpass will be downloaded immediately.
"items": [
    {
      "recipientId": "-8a04732e682g",
      "url": "staging-aws-tyrion.messangi.me/--"
    },
    {
      "recipientId": "135dfc977382g",
      "url": "staging-aws-tyrion.messangi.me/--"
    }
]
Copy the parameter serial (Template ID) and recipientId located in the response body for future requests.
Download Wallet Passes
Once the pass is created, we proceed to download the store card pass for the users.
The steps to download a wallet pass using the Wallet API are the following:
Request body
curl -X GET "https://staging-aws.messangi.me/ironbank/v2/wallet/templates/<WALLET_TEMPLATE_ID>/passes/<RECIPIENT_ID>/download" -H "accept: application/vnd.apple.pkpass" -H "Authorization: Bearer <YOUR_API_KEY>"
Copy the curl example above.
Paste the curl call into your favorite text editor.
Copy your API key and paste it in the "Authorization" header.
In the data section, select the URL and enter the id (serial) of the wallet template and his recipient Id (recipientId) into the URL:
https://staging-aws.messangi.me/ironbank/v2/wallet/templates/{serial}/passes/{recipientId}/download
Copy the code and paste it in your terminal command or copy the URL to your Browser.
Press Enter.
The pass will be downloaded immediately.
Copy the parameter serial (Template ID) and recipientId located in the response body for future requests.
Congratulations! You have created your own pass!