Create New Campaigns
Deliver and create pre-configured Campaigns.
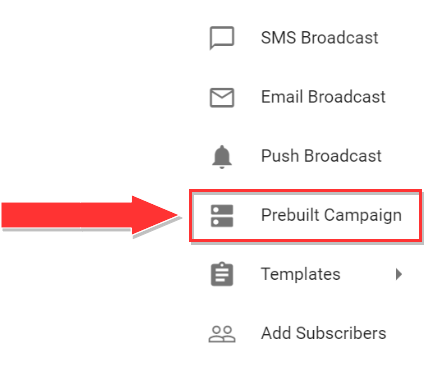
To start a Campaign creation, click on the Create (  ) button located in the left sidebar navigation menu.
 |
Once the Create button is clicked, select the PreBuilt Campaign option from the presented list.
 |
This will present a list of the PreBuilt Campaigns that are available to be created.
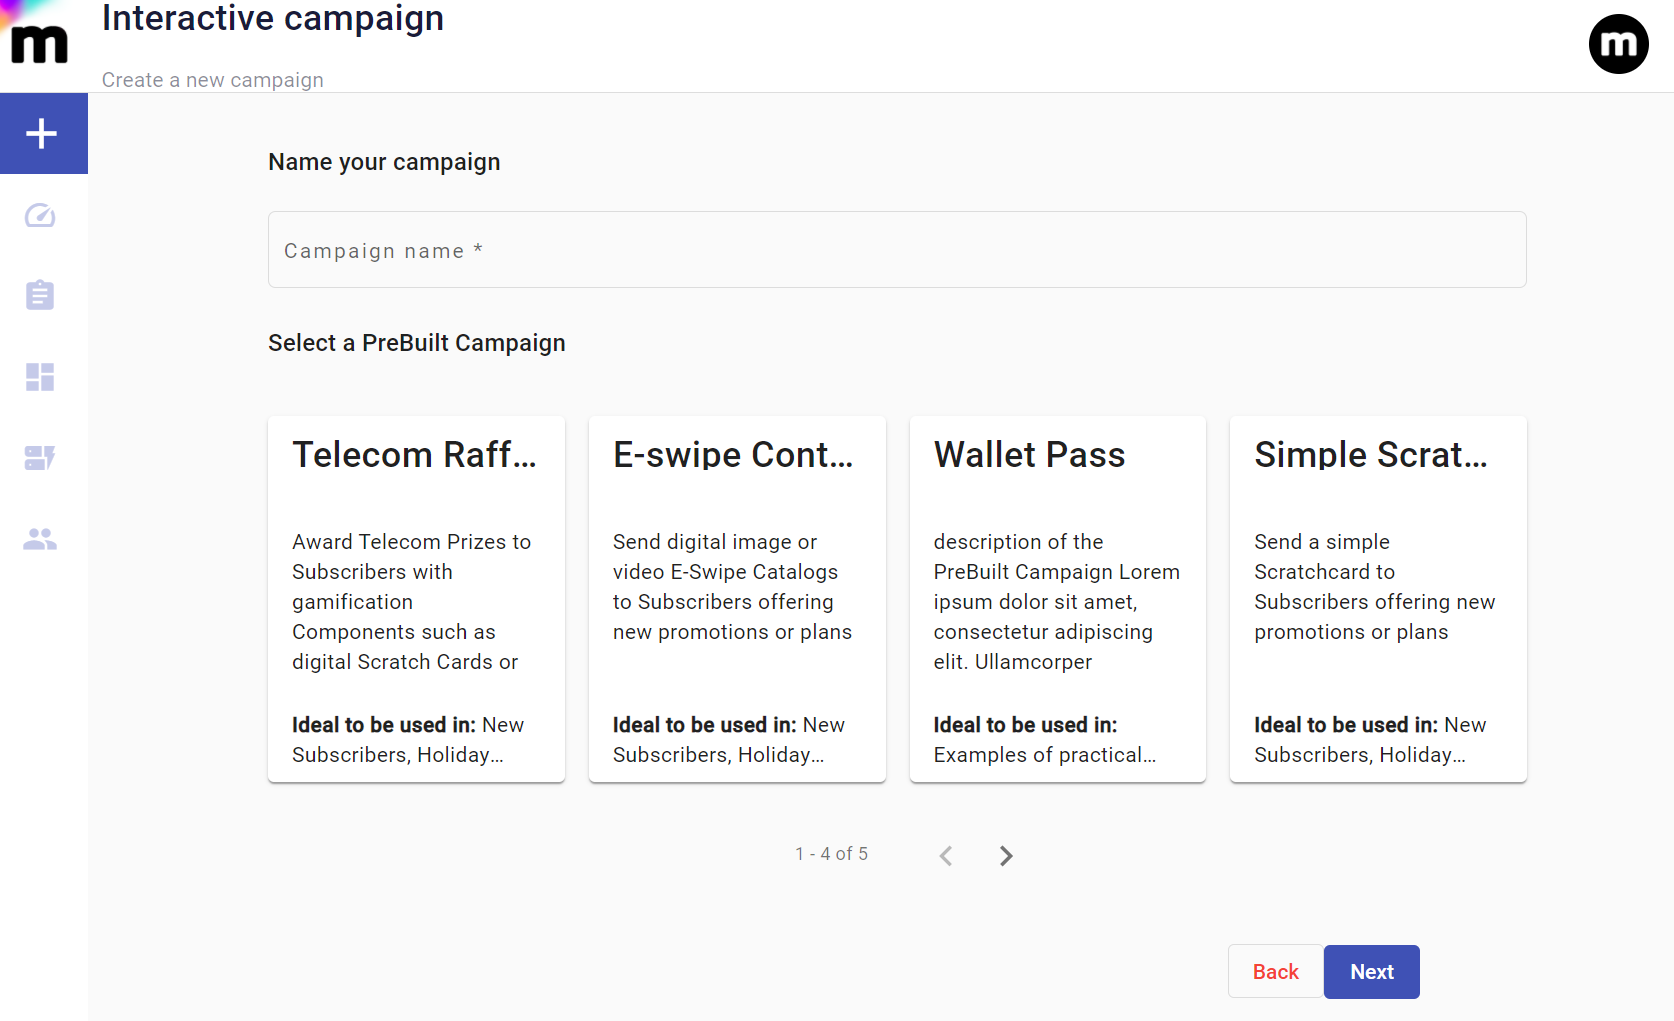 |
The following are the PreBuilt Campaigns that are currently available:
Telecom Raffle
E-Swipe Content
The steps to begin Creating a new Campaign are the following:
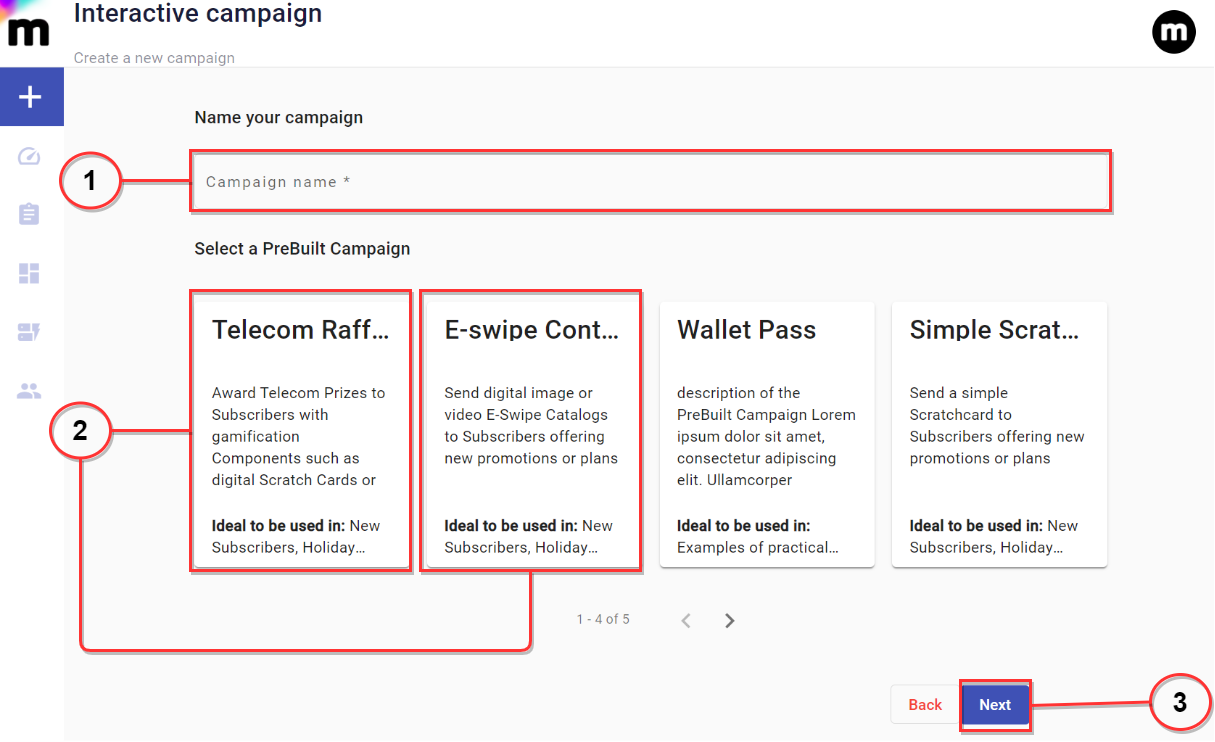
Start from the PreBuilt Campaign section by entering the Name of the Campaign. The name will be used to identify it.
Select the desired Campaign. Once you have selected any Campaign, there are five additional configuration steps to create the desired Campaign:
Delivery
Logic (only for Telecom Raffle Campaign)
Design
Message
Summary
Details
Click the Next Button.
Telecom Raffle
Used for delivering promotional Campaigns to a Telcom Customer-base. Campaign delivery is based on purchases made, and offering the chance to win prizes such as Data, and Minutes. Customers are engaged with an Interactive Web Content gamification component such as a Scratch Card or Spin2Win Wheel.
Delivery
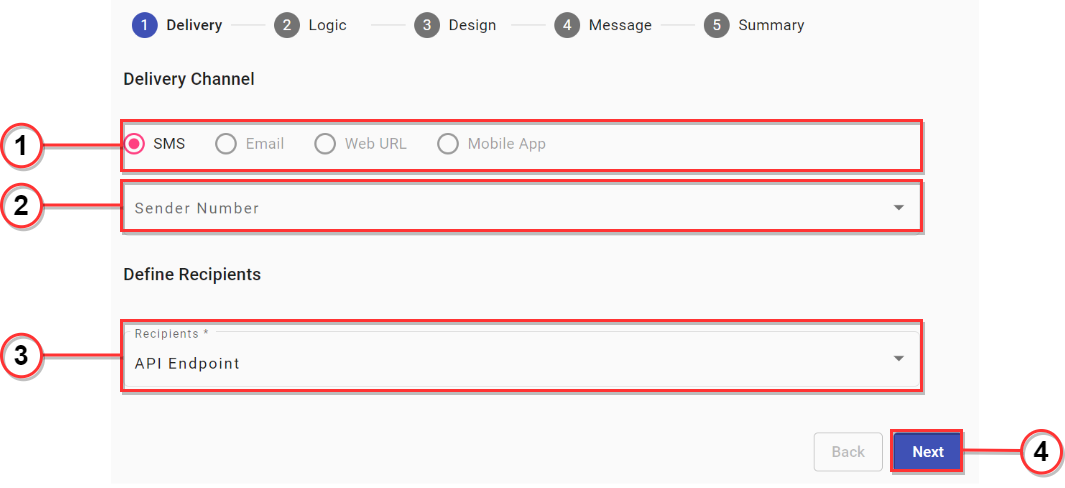
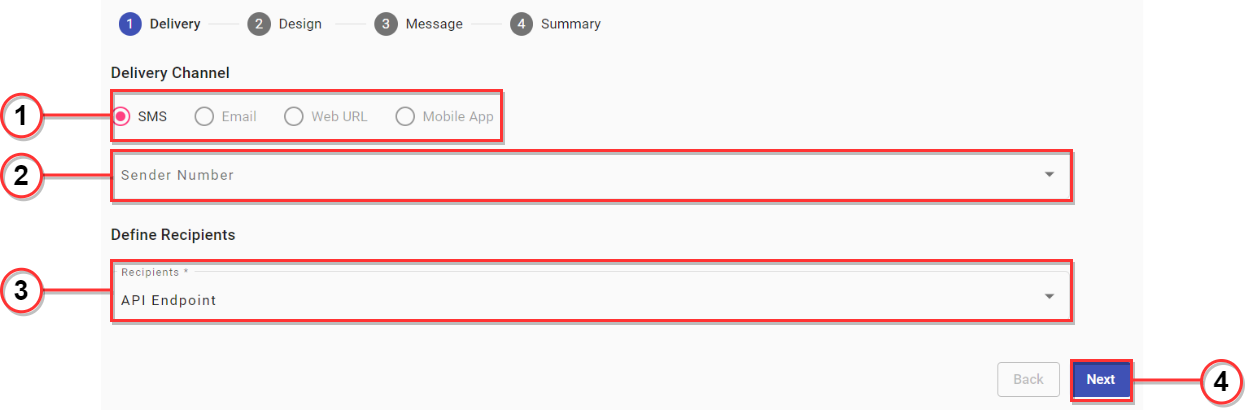
‘Delivery’ is the first step of the Telecom Raffle Campaign creator. In this step, Delivery of the Campaign is configured - such as the Delivery Channel and defining the Recipients that will receive the Campaign.
Follow these steps for the Delivery Configuration :
Select the main Delivery Channel of the Campaign - currently only SMS is available.
Select the Sender Number.
Set the Campaign Recipients and how Participants are defined.
Currently only API Endpoint is available. This will generate an Endpoint that the Space’s owner can integrate to their existing System to trigger the Campaign.
Select the Next button to continue the next step configuration.
Logic
‘Logic’ is the second step of the Telecom Raffle Campaign creator. In this step, the Raffle Logistics is configured - which controls which and how Prizes will be awarded to Participants.
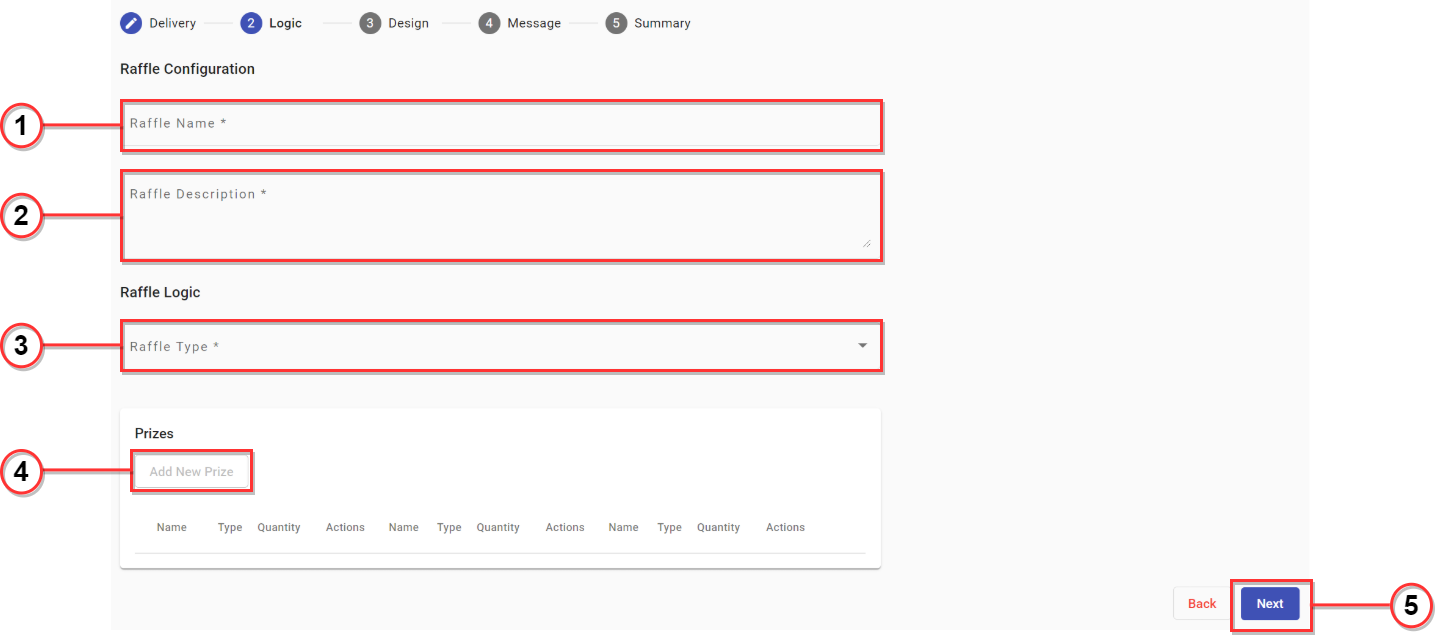 |
Follow these steps for the Logic Configuration :
Enter Raffle Name.
Enter a Raffle Description - should identify the type of Prizes and logistics that you wish to accomplish.
Configure the Raffle Logic to distribute the Prizes to Participants.
Select a Raffle Logic Type from the dropdown options. The dropdown menu will display three raffle type options: Always , Cycles, Random Select.
Always Win : This type of Raffle Logic will determine all Campaign Participants as Winners by awarding them a Prize. The Always Win Raffle will award all Prizes until there are none left.
Cycles : The Cycles type of Raffle Logic will determine the amount of Prizes to be awarded per each ‘Cycle’. A Cycle represents the number of Participations of the Campaign.
When you select the Cycles option, it will display new options to configure the Cycles: Cycle count, Reset Cycle count daily, Already Winner.
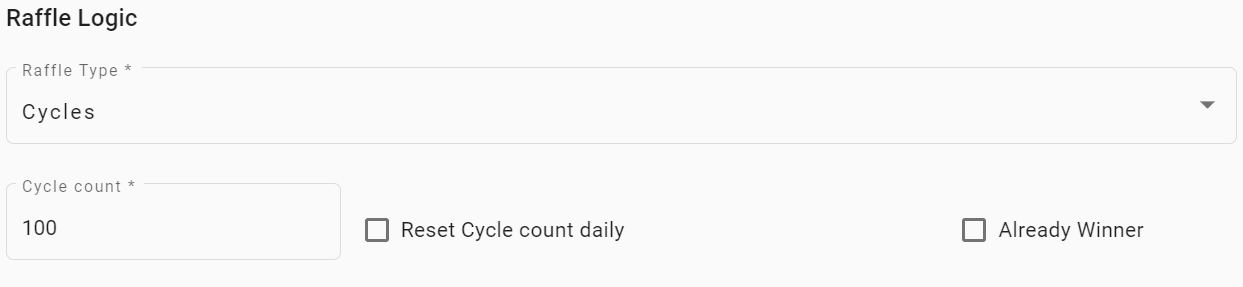
The Cycle Count determines the amount of Participations per each round of Cycle. Once the number of Cycle Counts have been accomplished, a Prize will be awarded.
For example, if the Cycle Count is set to 100 - after 100 Campaign Participations, a Prize will be awarded.
The Reset Cycle count daily controls the Cycle Count based on the number of daily Participations.
If the checkbox remains unchecked, the Cycle Count will remain the same regardless of the number of Participations.
For example, if the Cycle Count is set to 100, and there were only 50 Participations for Day 1, no Prizes would have been awarded. Once Day 2 begins (at 12am), the Cycle Count will remain at 50.
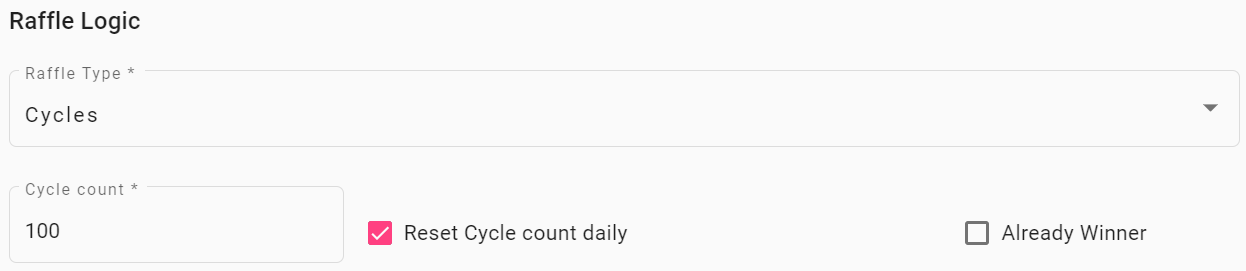
If this is checked, the set Cycle Count will reset every day.
For example, if the Cycle Count is set to 100, and there were only 50 Participations for Day 1, no Prizes were awarded. Once Day 2 begins (at 12am), the Cycle Count will reset back to 100.
Note
When Cycle Logic is selected, the Drops/Cycle must be determined for each configured Prize.
The Drops/Cycle is done when adding a New Prize. This allows to determine the amount of Prizes to award per each round of Cycles.
For example, if the Cycle Count is set to 100 and the Drops/Cycle is set to 1 in a Prize, 1 Prize will be awarded per each 100 Participations.

Random Select : It will randomly award Prizes to Participants based on the number of Campaign Participations per Prize awarded.
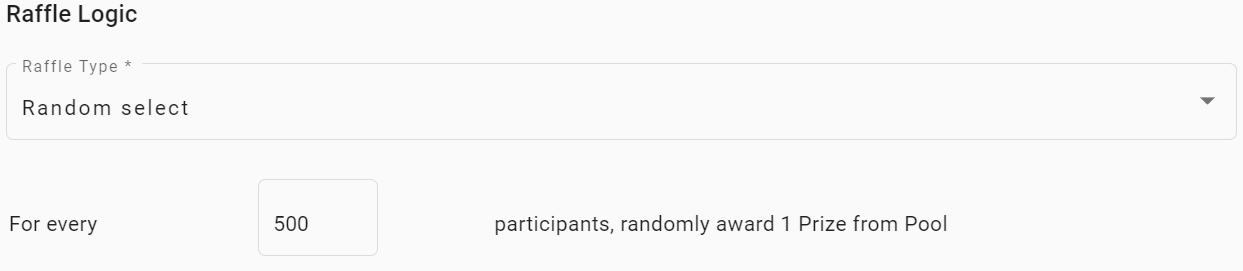
Enter the number of Campaign Participants per each prize awarded.
For example, if 100 is the number set, 1 Prize will be awarded for every 100 Campaign Participations.

In this section of the configuration, add the Prizesthat will be awarded to the Campaign Participants that are determined as Winners by the Raffle Logic.
To begin adding and configuring the Prizes that will be awarded to Campaign Participants, click on the Add New Prize button.
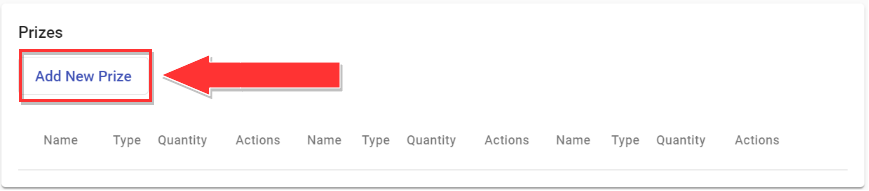
This will open a Dialog to start setting up the New Prize.
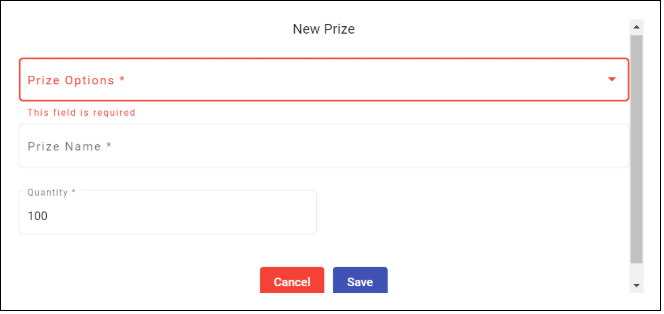
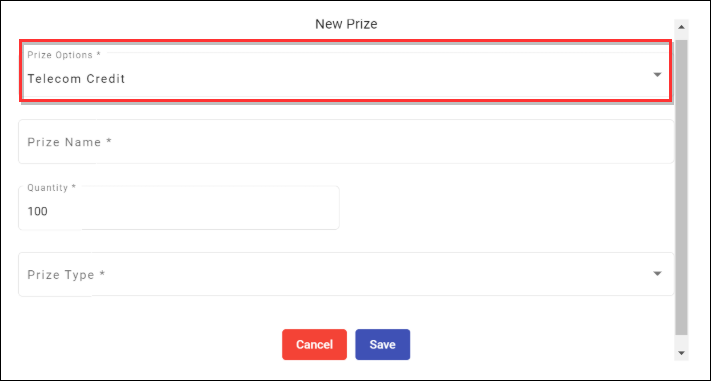
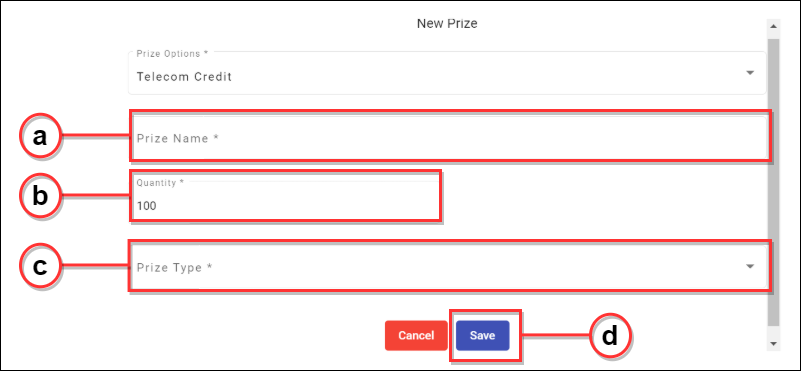
Select one of the options available from the Prize Options:
Telecom Credit
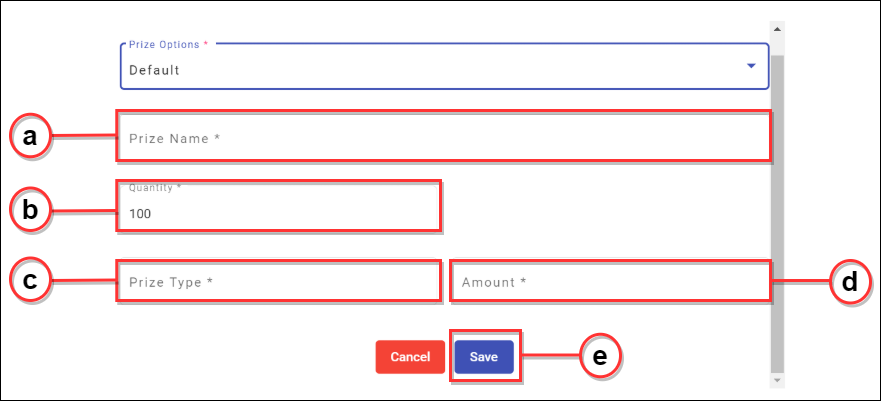
Default
Telecom Credit : Prizes that are Telecom Credits will be awarded directly to the Winner’s Telecom Account.
Note
Telecom Credit Prizes require a direct custom API integration.
Follow these steps to configure a Telecom Credit Prize:
Enter the Prize Name - this identity the Prize in future steps and Campaign Reportings.
Set the Quantity of this Prize available to be awarded.
For example, if the Quantity is set to 100, there will be 100 of this Prize to be awarded during the duration of the Campaign.
Select a Prize Type from the available options in the dropdown:
More than one Prize can be selected, allowing to ‘bundle’ Prize Types into one.
To configure a single Prize Type, check the checkbox next to the desired Prize, and set the required fields to complete the Prize set up.
To configure a Prize ‘bundle’ check the checkboxes next to the desired Prizes and then set the required fields for each selected Prizes to complete the set up.
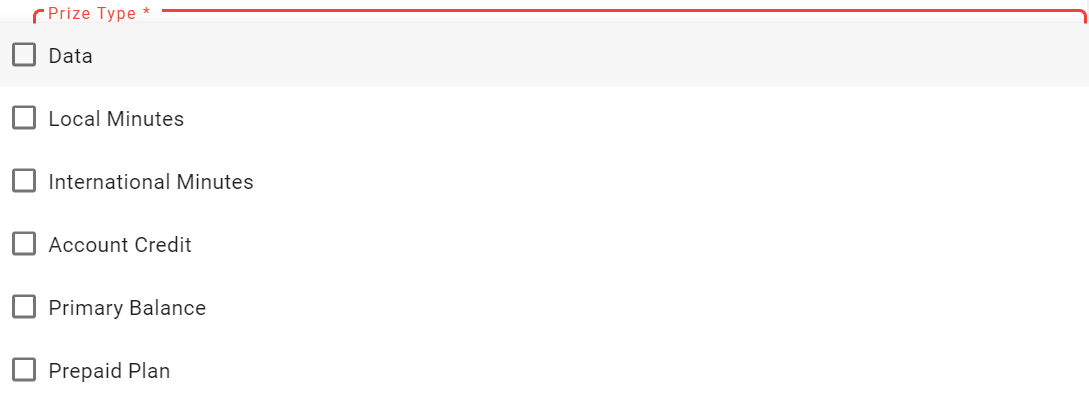
Prize Type
Description
Data
Awards Data to the Customer’s account.
To configure a Data Prize, determine the Amount and Credit Duration:
Amount : enter an available Data amount from the dropdown list.
Credit Duration : enter the validity of days that the Credit is available for to be used by the Winner.
Local Minutes
Awards Campaign Winners Local Minutes to their Telecom account.
To configure a Local Minutes Prize, determine the following fields:
Amount : select an available Minute amount from the dropdown list
Credit Duration : determines the validity of days that the Credit is available for to be used by the Winner.
International Minutes
Awards Campaign Winners International Minutes to their Telecom account.
To configure a Local Minutes Prize, determine the following fields:
Amount : select an available Minute amount from the dropdown list.
Credit Duration : determines the validity of days that the Credit is available for to be used by the Winner.
Account Credit
Awards Campaign Winners Credits to their Telecom account.
To configure an Account Credit Prize, determine the following field:
Amount : enter an available Credit Amount from the dropdown list.
Primary Balance
Awards Campaign Winners Balance to their Telecom account.
To configure a Primary Balance Prize, determine the following field:
Amount: select an available Credit Amount from the dropdown list.
PrePaid Plan
Awards Campaign Winners a PrePaid Plan to their Telecom account.
To configure a PrePaid Plan Prize, determine the following field:
After Configuring the Prizes to be awarded to Campaign Winners, click on the Next button to continue to the next step of the Campaign creation process.
Default Prize : It is configured when a Prize must be awarded in-person or by any other means.
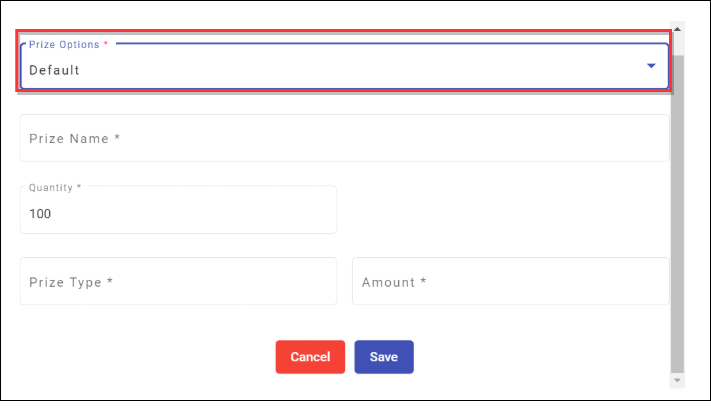
Follow these steps to configure a Default Prize:
Enter the Prize Name - this identity the Prize in future steps and Campaign Reportings.
Set the Quantity of this Prize available to be awarded
For example, if the Quantity is set to 100, there will be 100 of this Prize to be awarded during the duration of the Campaign.
Enter the Prize Type
Set the Amount that are included in the Prize given
After Configuring the Prizes to be awarded to Campaign Winners, click on the Next button to continue to the next step of the Campaign creation process.
Select the Next button to continue the next step configuration.
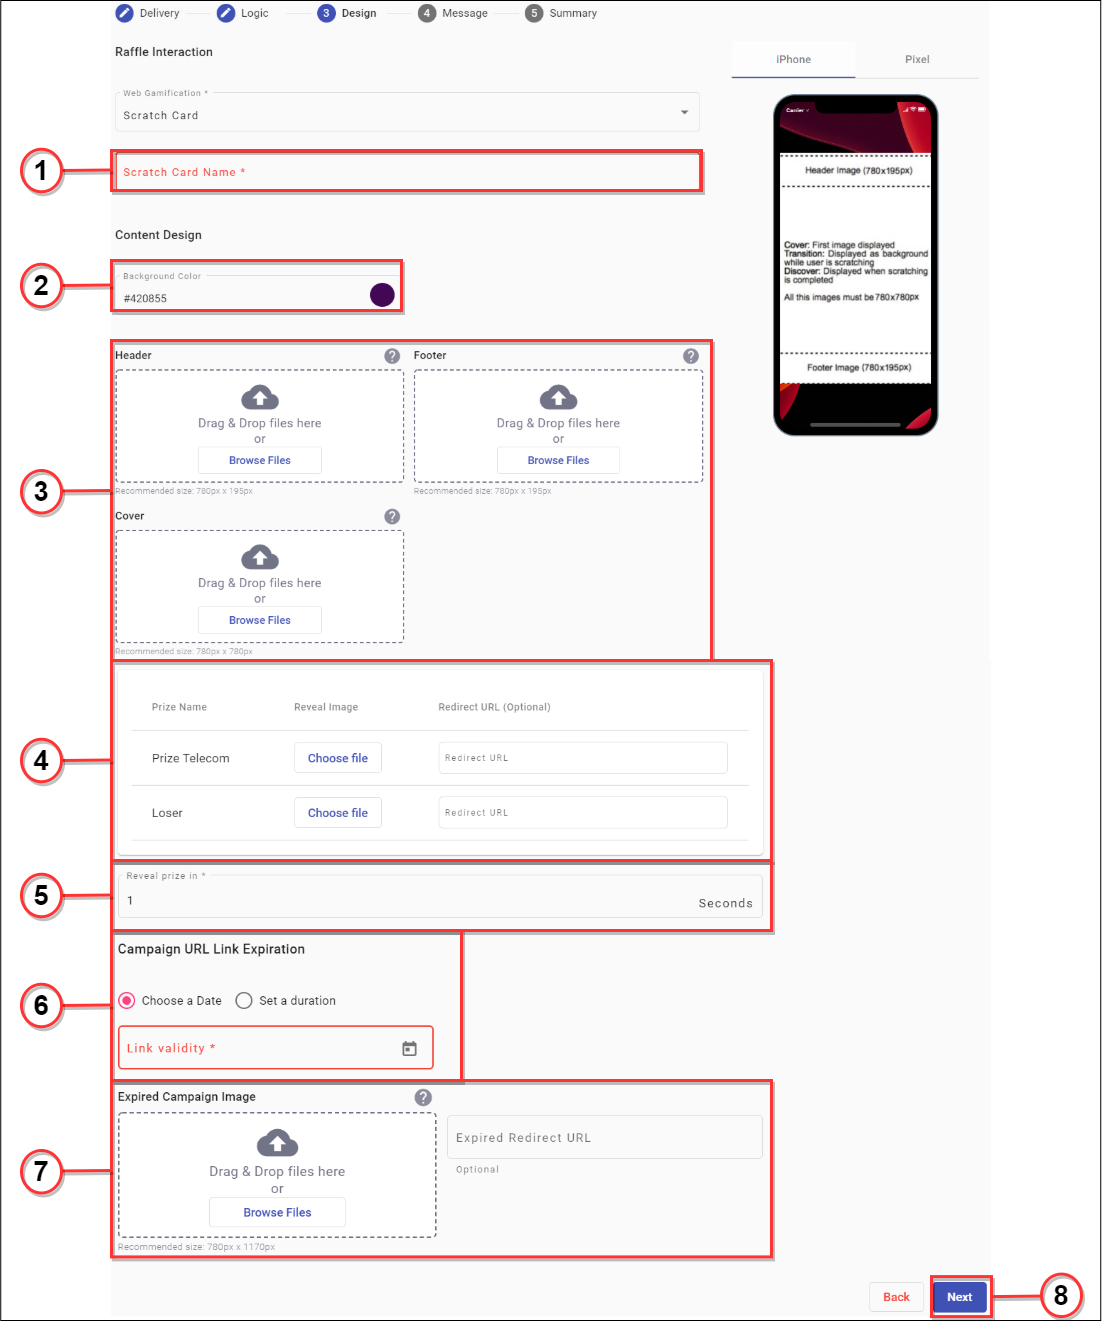
Design
‘Design’ is the third step of the Telecom Raffle Campaign creator. In this step, the Web Gamification interaction is configured. This is the content that is played by the Participants in order to find out whether they won a Prize or not.
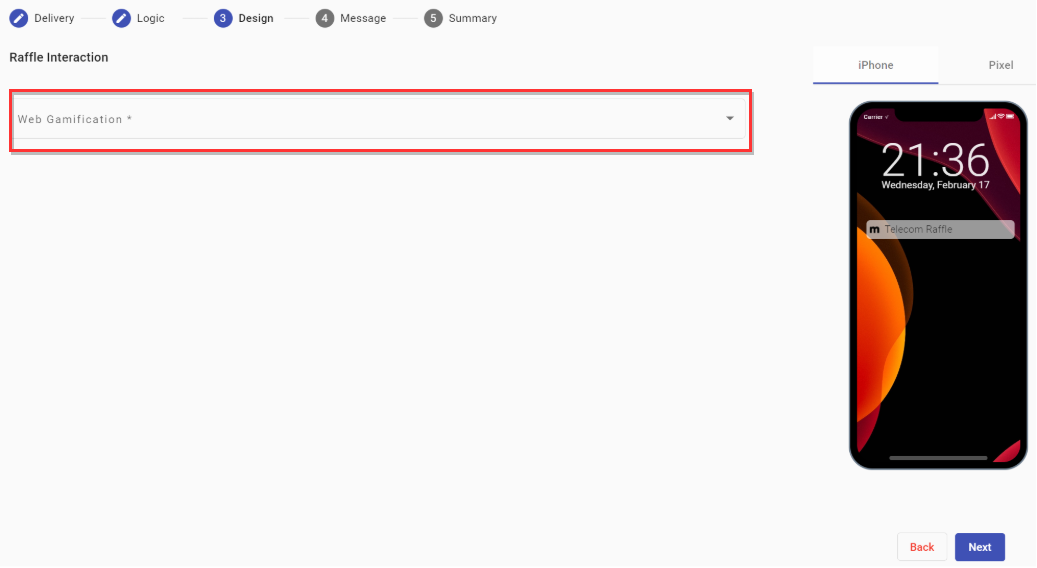 |
Select one of the presented options in the Web Gamification dropdown.
 |
Scratch Card : Offers a digital Scratch Card as the Interaction component for the Campaign.
To begin the Scratch Card Design creation, follow these steps:
Enter a Scratch Card Name - will be used to identify the template
In the Content Design section, set the look and feel by defining the images and assets for the Scratch Card.
Define a Background Color by using the Color Picker
Set the static images for Scratch Card that will remain the same throughout the experience.
The following images must be uploaded:
Header: 780 x 195px
Footer: 780 x 195px
Cover: first image that is displayed - 780 x 780px
From the configured Prizes in the previous step, upload the respective reveal images. A Loser Image must always be configured as well for those cases that the Participant is determined to not win a Prize.
In the table displayed, all configured Prizes require a reveal image to be uploaded. A Prize reveal image can also have a redirect URL associated to it, that will direct the user to that link if it is clicked after the final interaction.
Set the prize reveal timeout in seconds. If the end user does not scratch the card within a certain time, the prize will be revealed.
There are two options available to set a Campaign expiration date:
Choose a date : If you select the Choose a date option, into the Link validity field the calendar icon is displayed where you can set the expiration date of the campaign.

Set a duration : If you select the Set a duration option, into the Link validity field you can specify the expiration of the campaign in hours.

Set the Expired Campaign Image. You can set an image when the Campaign expires. If the user selects the expired campaign image you set, he will be redirected to the URL you entered into the Expired Redirect URL field.
Select the Next button to continue the next step configuration.
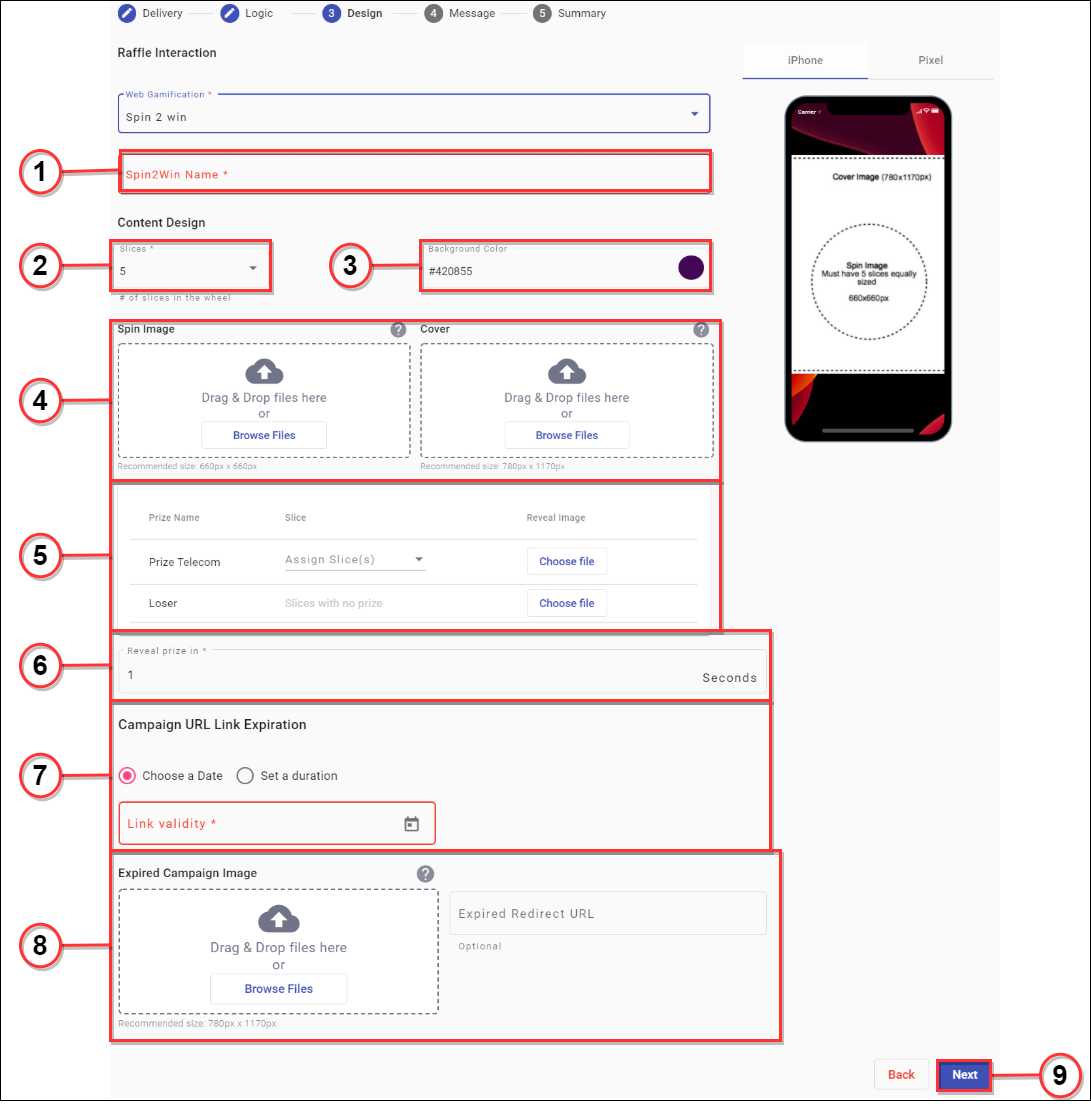
Spin 2 win : Offers a digital Scratch Card as the Interaction component for the Campaign.
To begin the Spin 2 Win creation, follow these steps:
Enter a Spin Card Name - will be used to identify the template.
In the Content Design section , set the look and feel by defining the images and assets.
Define the number of Slices for the Spin Wheel.
Define a Background Color by using the Color Picker.
Set the static images for the Spin Wheel that will remain the same throughout the experience.
The following images must be uploaded:
Spin Image: 660 x 660px
Cover: first image that is displayed - 780 x 1170px
From the configured Prizes in the previous step, upload the respective reveal images and assign the Slices associated to the Prize.
A Loser Image must always be configured as well for those cases that the Participant is determined to not win a Prize.
Set the prize reveal timeout in seconds. If the end user does not scratch the card within a certain time, the prize will be revealed.
There are two options available to set a Campaign expiration date:
Choose a date : If you select the Choose a date option, into the Link validity field the calendar icon is displayed where you can set the expiration date of the campaign.
Set a duration : If you select the Set a duration option, into the Link validity field you can specify the expiration of the campaign in hours.
Set the Expired Campaign Image. You can set an image when the Campaign expires. If the user selects the expired campaign image you set, he will be redirected to the URL you entered into the Expired Redirect URL field.
Select the Next button to continue the next step configuration.
Message
‘Message’ is the fourth step of the Telecom Raffle Campaign creator.
In this step, the messages that will be used to deliver the Campaign to Recipients are created.
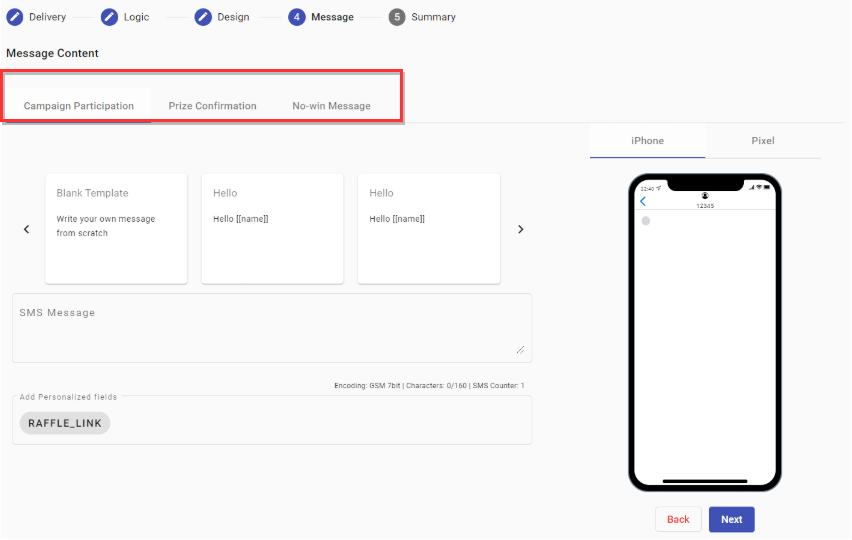 |
In the Message Content section, three messages options are presented:
Raffle Participation
Prize Confirmation
No-win Message
Raffle Participation : this is the message that is delivered to all Campaign Recipients inviting them to participate.
A Template can be selected to fast-forward the process, or it can be started from Scratch.
It is required to add and select the RAFFLE_LINK to the message.
 |
Prize Confirmation : This message is used to be delivered to all Campaign Winners as a Confirmation of their Prize.
By Default, the Prize Confirmation message is disabled.
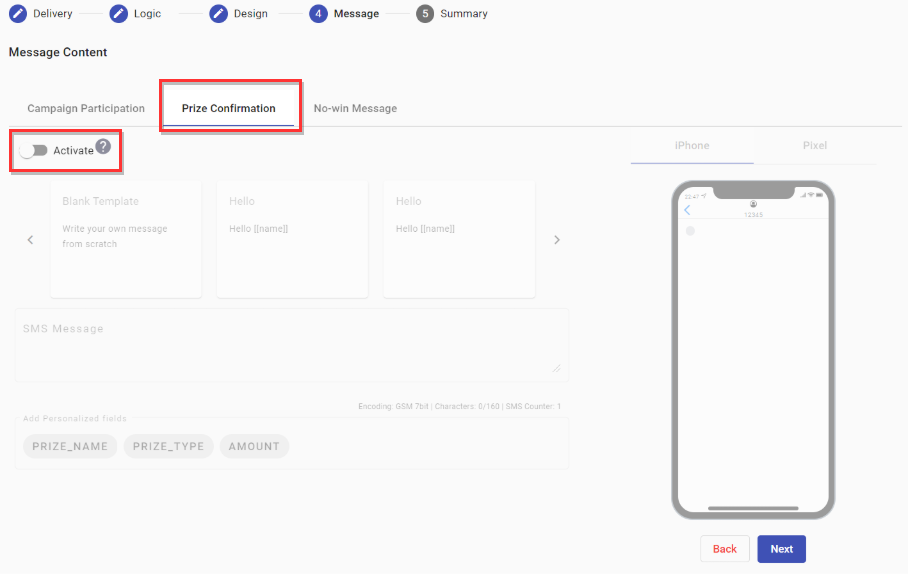 |
To enable this message, click on the Activate toggle.

Once Activated, the Prize Confirmation Message is able to be configured.
No-win Message : This message is used to be delivered to all Campaign Losers.
By Default, the No-win message is disabled.
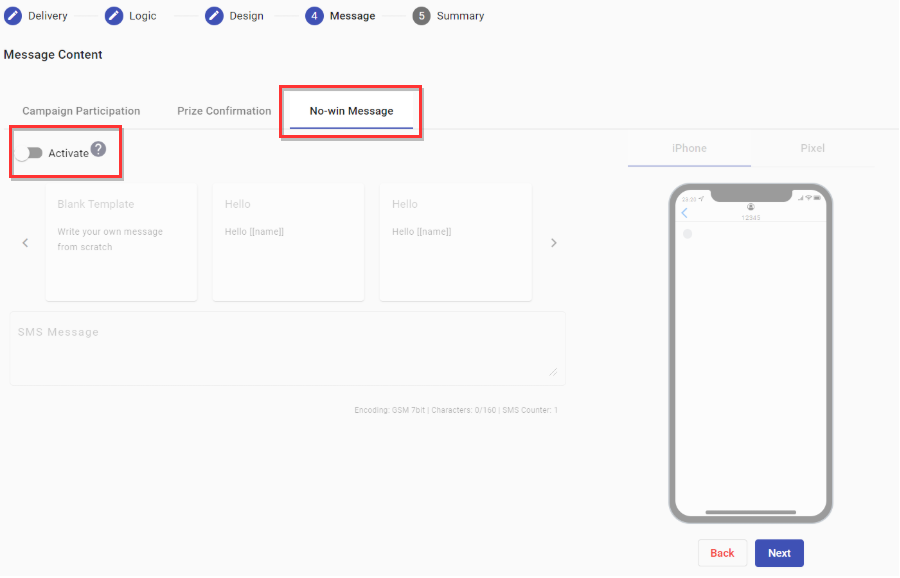 |
To enable this message, click on the Activate toggle.
Once Activated, the No-win Message is able to be configured.
Summary
‘Summary’ is the fifth step of the Telecom Raffle Campaign creator.
This will review and display the configured Campaign Details and set the desired activation time.
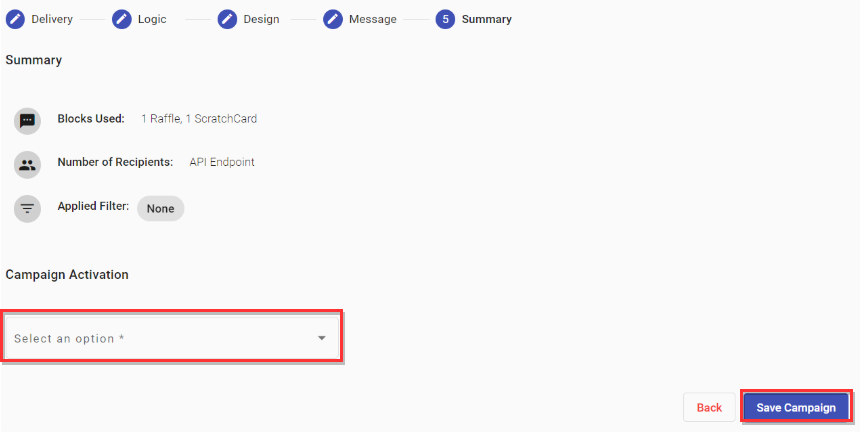 |
Follow these steps for the Summary Configuration :
Set the desired time for when the Campaign is to be launched and activated by selecting one of the following options presented in the Campaign Activation dropdown:
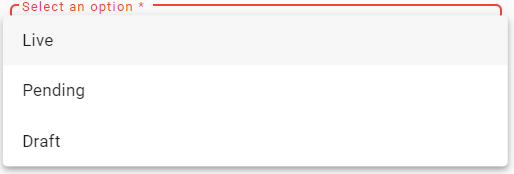
Live: Campaign will be activated and launched right away.
Pending: Campaign configuration is ready to go, but activation date has not been set.
Draft: Campaign configuration is not complete, and is set as Draft to be completed at a later date.
Once the desired option has been selected, click on the Save Campaign button.
Details
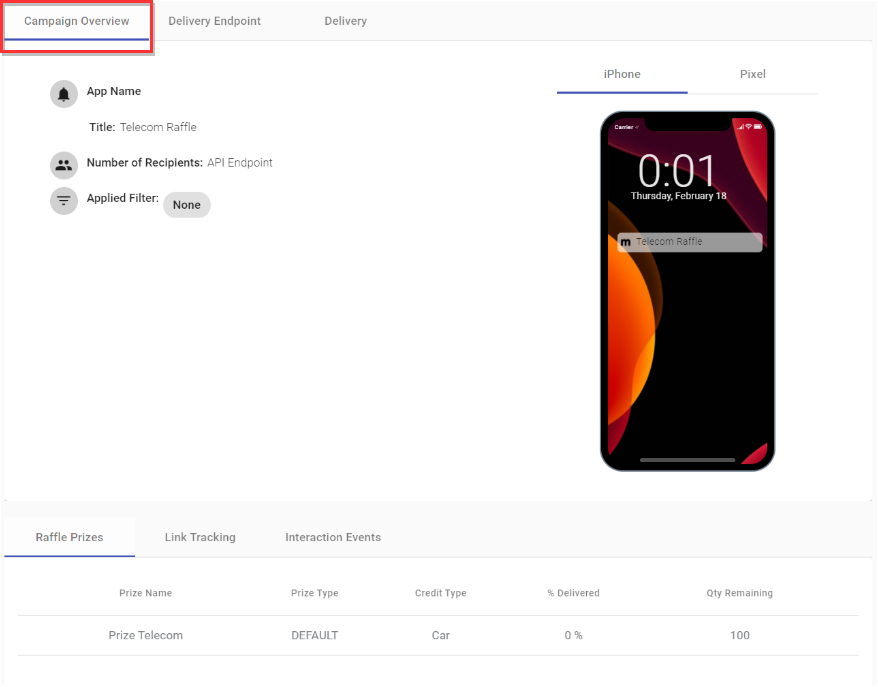
When the campaign has been created, go to the Details section to View the Campaign Details and metrics in real-time.

Three tabs are presented in the Details section:
Campaign Overview
Delivery Endpoint
Delivery
Campaign Overview : Review and display the configured Telecom Raffle Campaign Details.
 |
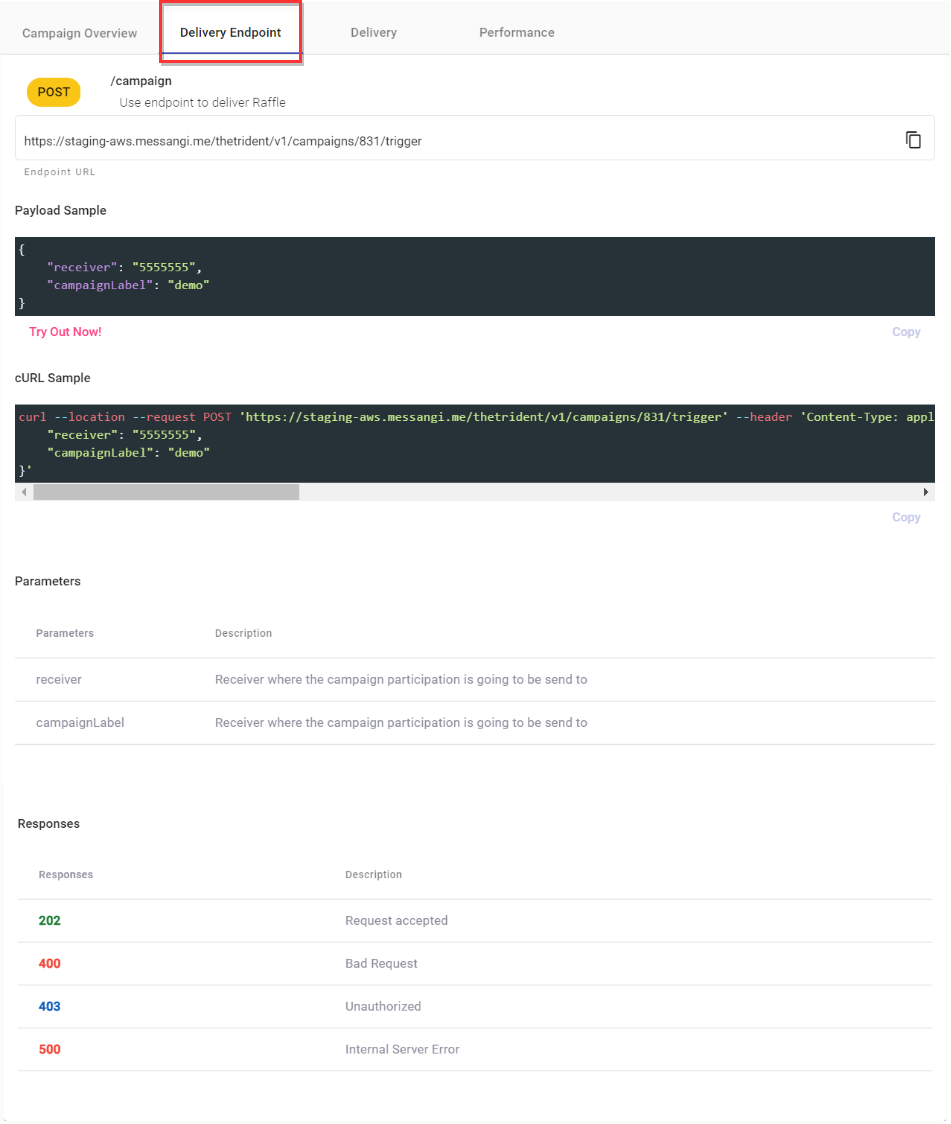
Delivery Endpoint : When the Telecom Raffle Campaign has been created in Live Status, the Delivery Endpoint is available.

We provide the following endpoint, located in the Post Section:
https://staging-aws.messangi.me/thetrident/v1/campaigns/<Id _Campaign>/trigger
The developer requires to call this endpoint in order to send the SMS text messages to the final users. For example, If the end user makes a recharge of $12 (USD), the system calls that endpoint mentioning “Hey! the receiver with the cell phone number 345654 made a recharge of $12 (USD)”. Therefore, when making the request to the API, it is responsible for sending the SMS text message with a link to the end user. The developer needs to copy the endpoint and the Payload Sample.
{
  "receiver": "5555555",
  "campaignLabel": "demo"
}
For each campaign a different Delivery endpoint is generated where 702 is the ID of the campaign located in the Live Status.

We offer you to test the campaign when the end user makes the call by selecting the Try Out now! button located below the Payload.

When you select the Try Out now! Button, Try Out filling the blank fields Dialog will appear.
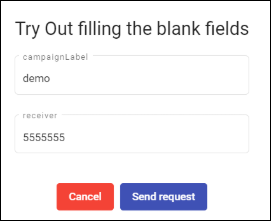
You can test the campaign by providing the phone number of the end user in the "receiver" field (who will receive the notification of the campaign). If you select the Send Request button, immediately the message is sent to the end user (receiver) and the platform will provide you the response of your request in the Try out response section.

E - swipe Content
This Campaign allows you to set multiple images as pages of a book or digital magazine to deliver content to their customers. Users who receive this kind of card will have to swipe page by page to navigate through all content.
Delivery
‘Delivery’ is the first step of the E-Swipe Campaign creator. In this step, Delivery of the Campaign is configured - such as the Delivery Channel and defining the Recipients that will receive the Campaign.
Follow these steps for the Delivery Configuration :
Select the main Delivery Channel of the Campaign - currently only SMS is available.
Select the Sender Number.
Set the Campaign Recipients and how Participants are defined.
Currently only API Endpoint is available. This will generate an Endpoint that the Space’s owner can integrate to their existing System to trigger the Campaign.
Select the Next button to continue the next step configuration.
Design
‘Design’ is the second step of the E-swipe Content Campaign creator. In this step, the swipe content is configured. Set the swipe content by images or videos to their customers.
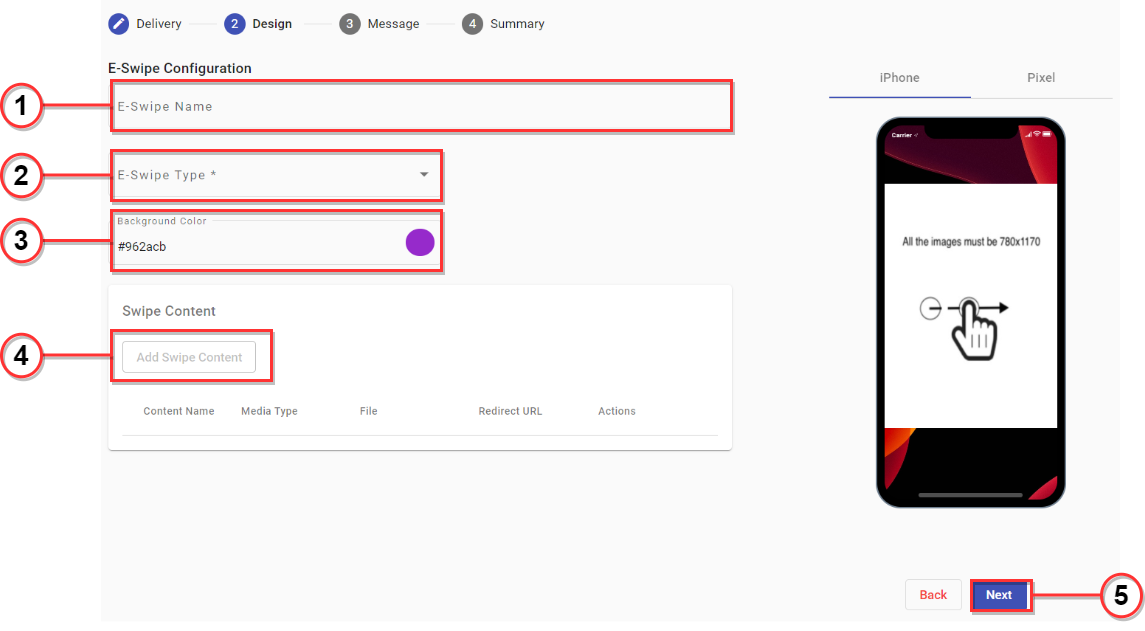 |
Follow these steps for the Design Configuration :
Enter the E-Swipe Name
Select the E-Swipe Type from the dropdown options. The dropdown menu will display two swipe type options: Image, Video.
Image : This type of Swipe Design will determine the content of the digital magazine. You can set the digital magazine by adding multiple images.
Video: This type of Swipe Design will determine the content of the digital magazine. You can set the digital magazine by adding multiple videos.
Define a Background Color by using the Color Picker.
Set the look and feel by defining the images or videos for the E-swipe by selecting the Add Swipe Content button located in the Swipe Content section.
If you selected “Image” in the E-Swipe Type section, it will display new options to configure the swipe content.
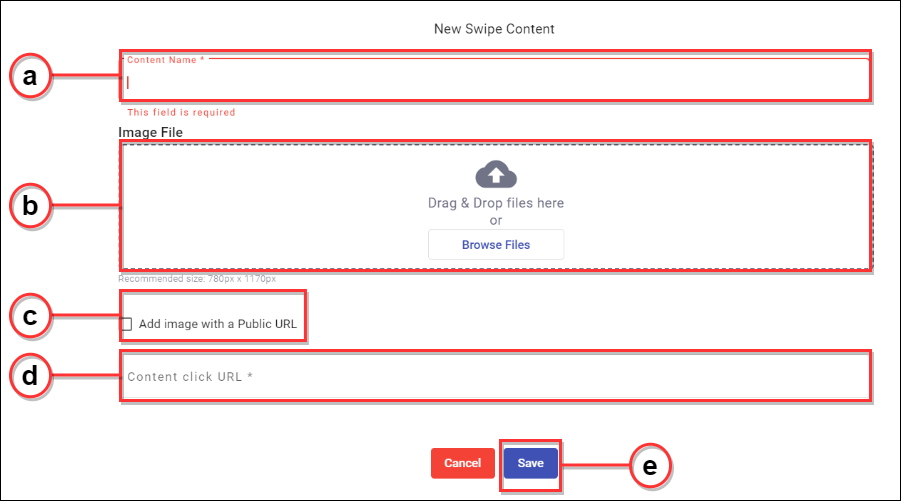
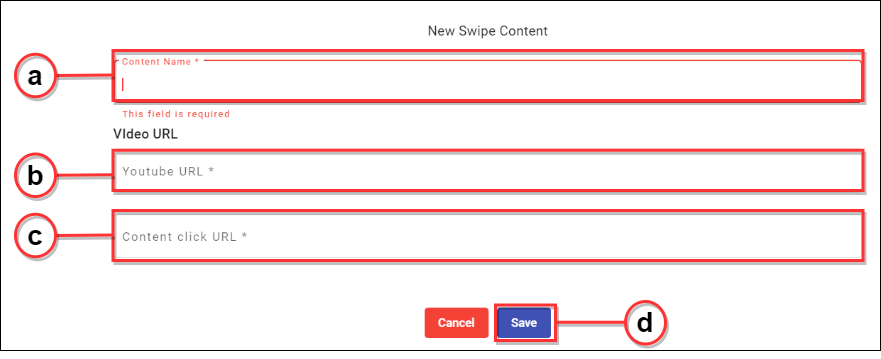
To configure a New Swipe Content for images, determine the following fields:
Enter the name of the content.
Add the static image for E-swipe that will remain the same throughout the experience.
The following image must be uploaded:
Image File : 780px x 1170px
If you want to Add the image with a Public URL select the checkbox. It will display a placeholder where you can place the public URL.

Place the URL Content where you want the user to be redirected when he selects the previous uploaded image.
Select the Save button.
Note
Repeat the same steps for each image you want to add to the digital magazine per page.
If you selected “Video” in the E-Swipe Type section, it will display new options to configure the swipe content.
To configure a New Swipe Content for videos, determine the following fields:
Enter the name of the content.
Add the Video URL (Youtube video link) for E-swipe that will remain the same throughout the experience.
Place the URL Content where you want the user to be redirected when he selects the previous added video.
Select the Save button.
Note
Repeat the same steps for each video you want to add to the digital magazine per page.
Once you have added the Swipe Content, select the next button.
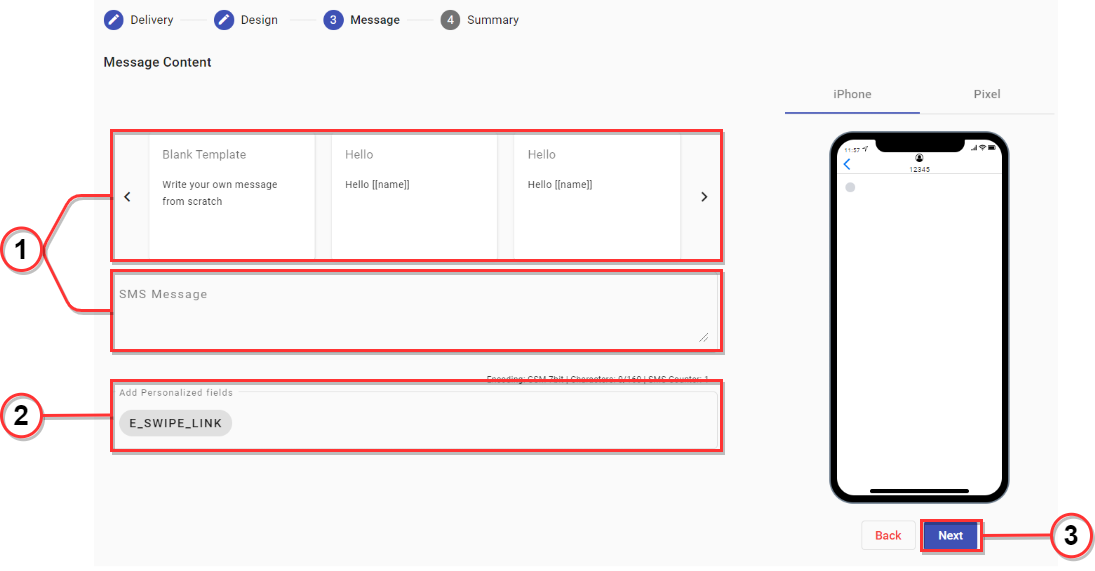
Message
‘Message’ is the third step of the E-swipe Campaign creator.
In this step, the messages that will be used to deliver the Campaign to Recipients are created.
Follow these steps for the Message Configuration :
In the Message Content section, a Template can be selected to fast-forward the process, or it can be started from Scratch.
It is required to add and select the E_SWIPE_LINK to the message.

Select the Next button.
Summary
‘Summary’ is the fourth step of the E-Swipe Campaign creator.
This will review and display the configured Campaign Details and set the desired activation time.
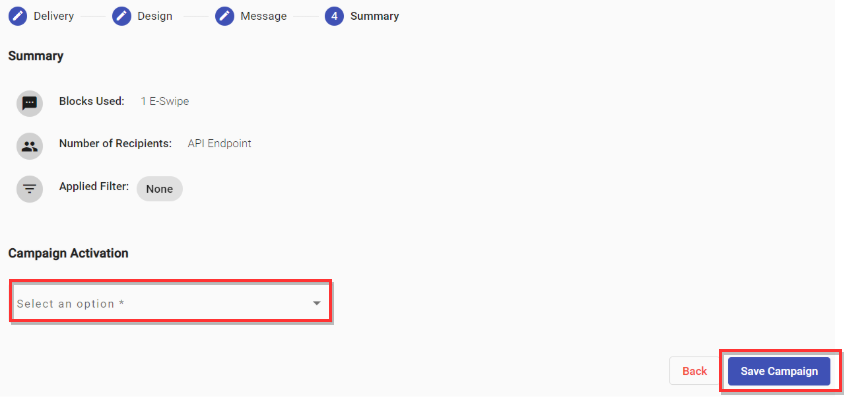 |
Follow these steps for the Summary Configuration :
Set the desired time for when the Campaign is to be launched and activated by selecting one of the following options presented in the Campaign Activation dropdown:
Live: Campaign will be activated and launched right away.
Pending: Campaign configuration is ready to go, but activation date has not been set.
Draft: Campaign configuration is not complete, and is set as Draft to be completed at a later date.
Once the desired option has been selected, click on the Save Campaign button.
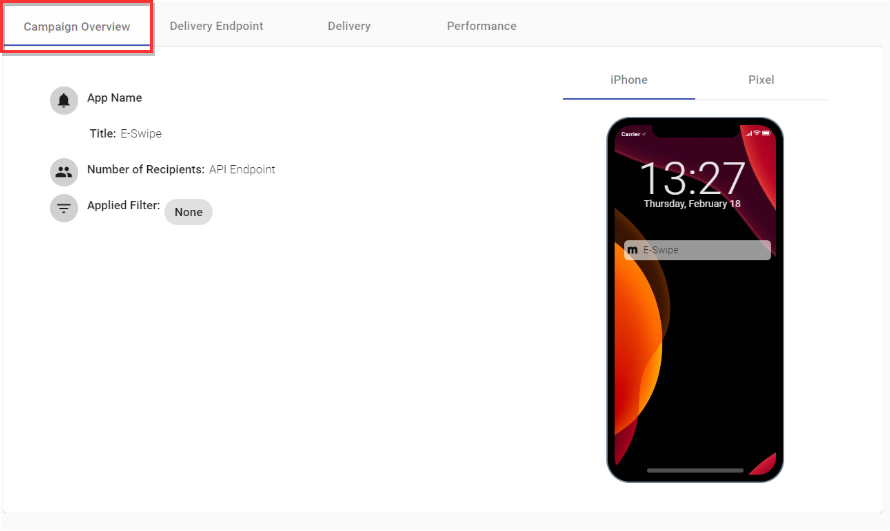
Details
When the campaign has been created, go to the Details section to View the Campaign Details and metrics in real-time.

Three tabs are presented in the Details section:
Campaign Overview
Delivery Endpoint
Delivery
Campaign Overview : Review and display the configured E-swipe Campaign Details.
 |
Delivery Endpoint : When the E-Swipe Campaign has been created in Live Status, the Delivery Endpoint is available.
We provide the following endpoint, located in the Post Section:
https://staging-aws.messangi.me/thetrident/v1/campaigns/<Id _Campaign>/trigger
The developer requires to call this endpoint in order to send the SMS text messages to the final users. For example, If the end user makes a recharge of $12 (USD), the system calls that endpoint mentioning “Hey! the receiver with the cell phone number 345654 made a recharge of $12 (USD)”. Therefore, when making the request to the API, it is responsible for sending the SMS text message with a link to the end user. The developer needs to copy the endpoint and the Payload Sample.
{
  "receiver": "5555555",
  "campaignLabel": "demo"
}
For each campaign a different Delivery endpoint is generated where 831is the ID of the campaign located in the Live Status.

We offer you to test the campaign when the end user makes the call by selecting the Try Out now! button located below the Payload.
When you select the Try Out now! Button, Try Out filling the blank fields Dialog will appear.
You can test the campaign by providing the phone number of the end user in the "receiver" field (who will receive the notification of the campaign). If you select the Send Request button, immediately the message is sent to the end user (receiver) and the platform will provide you the response of your request in the Try out response section.
